By: Team F12-4 Since: Sep 2019 Licence: MIT
- 1. Setting up
- 2. Design
- 3. Implementation
- 4. Documentation
- 5. Testing
- 6. Dev Ops
- Appendix A: Product Scope
- Appendix B: User Stories
- Appendix C: Use Cases
- Appendix D: Non Functional Requirements
- Appendix E: Glossary
- Appendix F: Product Survey
- Appendix G: Instructions for Manual Testing
- G.1. Launch and Shutdown
- G.2. Deleting an expense
- G.3. Adding tags to an expense
- G.4. Removing tags from an expense
- G.5. Filtering expenses by tag
- G.6. Listing out all existing tags
- G.7. Adding an expense to an archive
- G.8. Displaying the expenses in an archive
- G.9. Displaying a list of archive names
- G.10. Deleting an expense from an archive
- G.11. Reverting/unarchiving an expense from an archive
1. Setting up
Refer to the guide here.
2. Design
2.1. Architecture
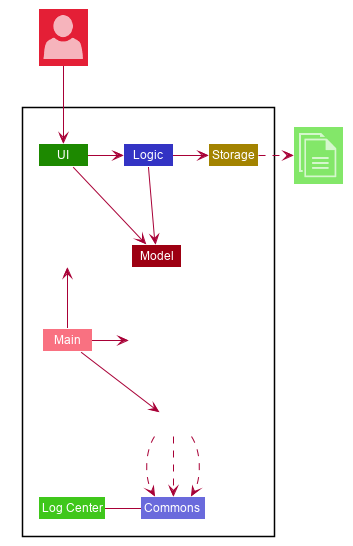
The Architecture Diagram given above explains the high-level design of the App. Given below is a quick overview of each component.
The .puml files used to create diagrams in this document can be found in the diagrams folder.
Refer to the Using PlantUML guide to learn how to create and edit diagrams.
|
-
At app launch: Initializes the components in the correct sequence, and connects them up with each other.
-
At shut down: Shuts down the components and invokes cleanup method where necessary.
Commons represents a collection of classes used by multiple other components.
The following class plays an important role at the architecture level:
-
LogsCenter: Used by many classes to write log messages to the App’s log file.
The rest of the App consists of four components.
Each of the four components
-
Defines its API in an
interfacewith the same name as the Component. -
Exposes its functionality using a
{Component Name}Managerclass.
For example, the Logic component (see the class diagram given below) defines it’s API in the Logic.java interface and exposes its functionality using the LogicManager.java class.

How the architecture components interact with each other
The Sequence Diagram below shows how the components interact with each other for the scenario where the user issues the command delete 1.
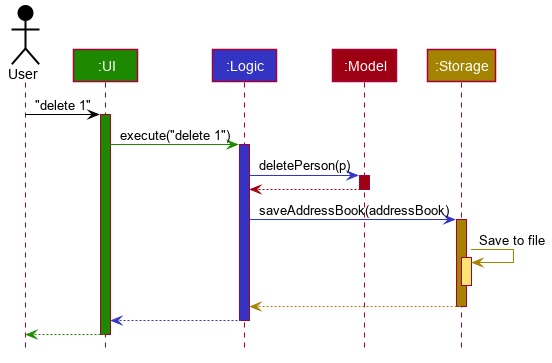
delete 1 commandThe sections below give more details of each component.
2.2. UI component
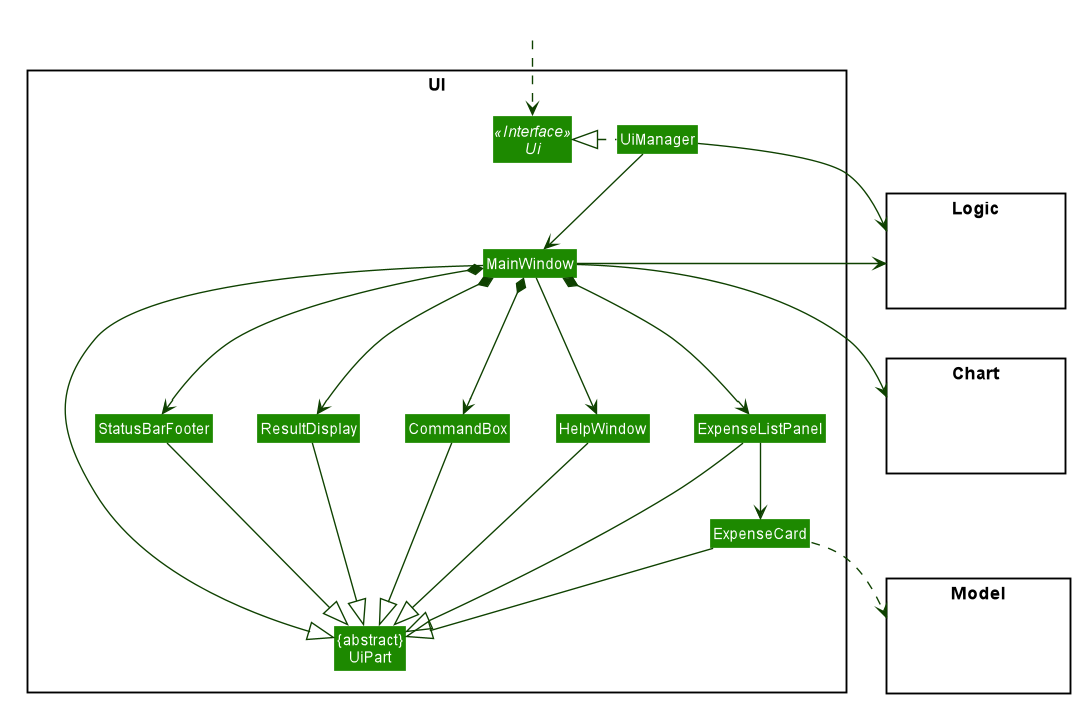
API : Ui.java
The UI consists of a MainWindow that is made up of parts e.g. CommandBox`, ResultDisplay, ExpenseListPanel, StatusBarFooter, ChartBox etc. All these, including the MainWindow, inherit from the abstract UiPart class.
The UI component uses JavaFx UI framework. The layout of these UI parts are defined in matching .fxml files that are in the src/main/resources/view folder. For example, the layout of the MainWindow is specified in MainWindow.fxml
The UI component,
-
Executes user commands using the
Logiccomponent. -
Listens for changes to
Modeldata so that the UI can be updated with the modified data. -
Has a specialized
Chartcomponent that deals specifically with the generation and rendering of charts onto theMainWindow.
2.3. Logic component
API :
Logic.java
-
Logicuses theBillboardParserclass to parse the user command. -
This results in a
Commandobject which is executed by theLogicManager. -
The command execution can affect the
Model(e.g. adding a person). -
The result of the command execution is encapsulated as a
CommandResultobject which is passed back to theUi. -
In addition, the
CommandResultobject can also instruct theUito perform certain actions, such as displaying help to the user.
Given below is the Sequence Diagram for interactions within the Logic component for the execute("delete 1") API call.
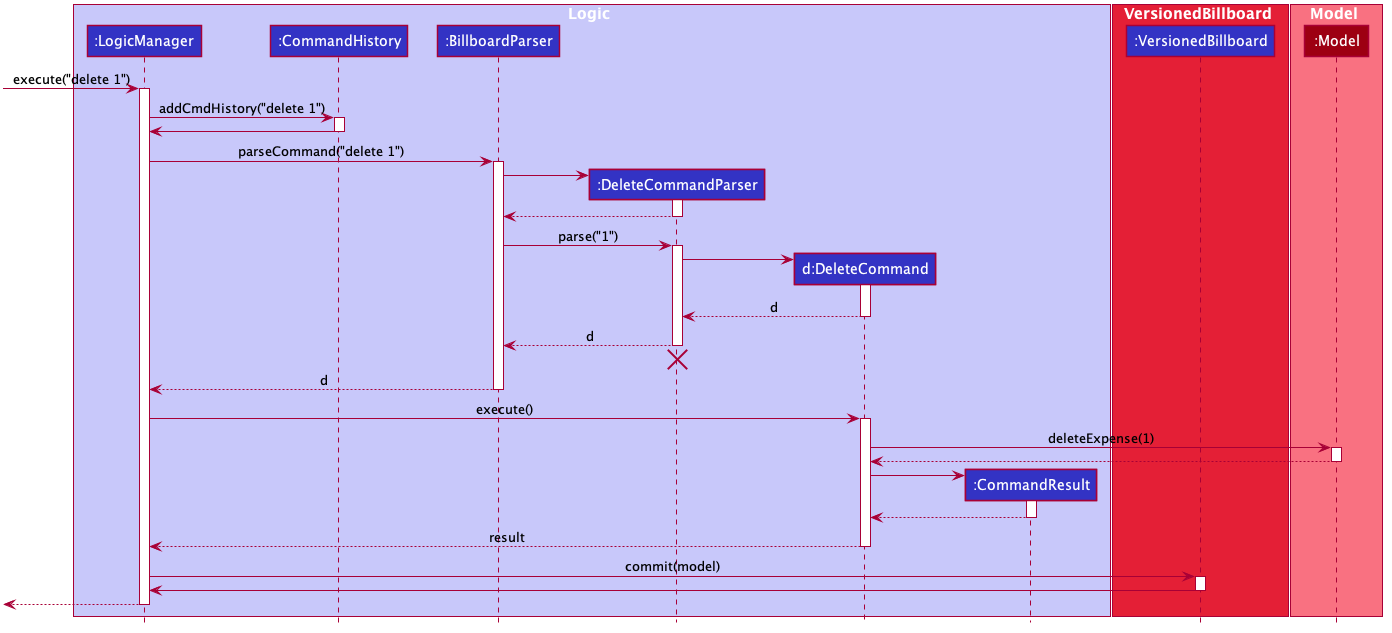
delete 1 Command
The lifeline for DeleteCommandParser should end at the destroy marker (X) but due to a limitation of PlantUML, the lifeline reaches the end of diagram.
|
2.4. Model component
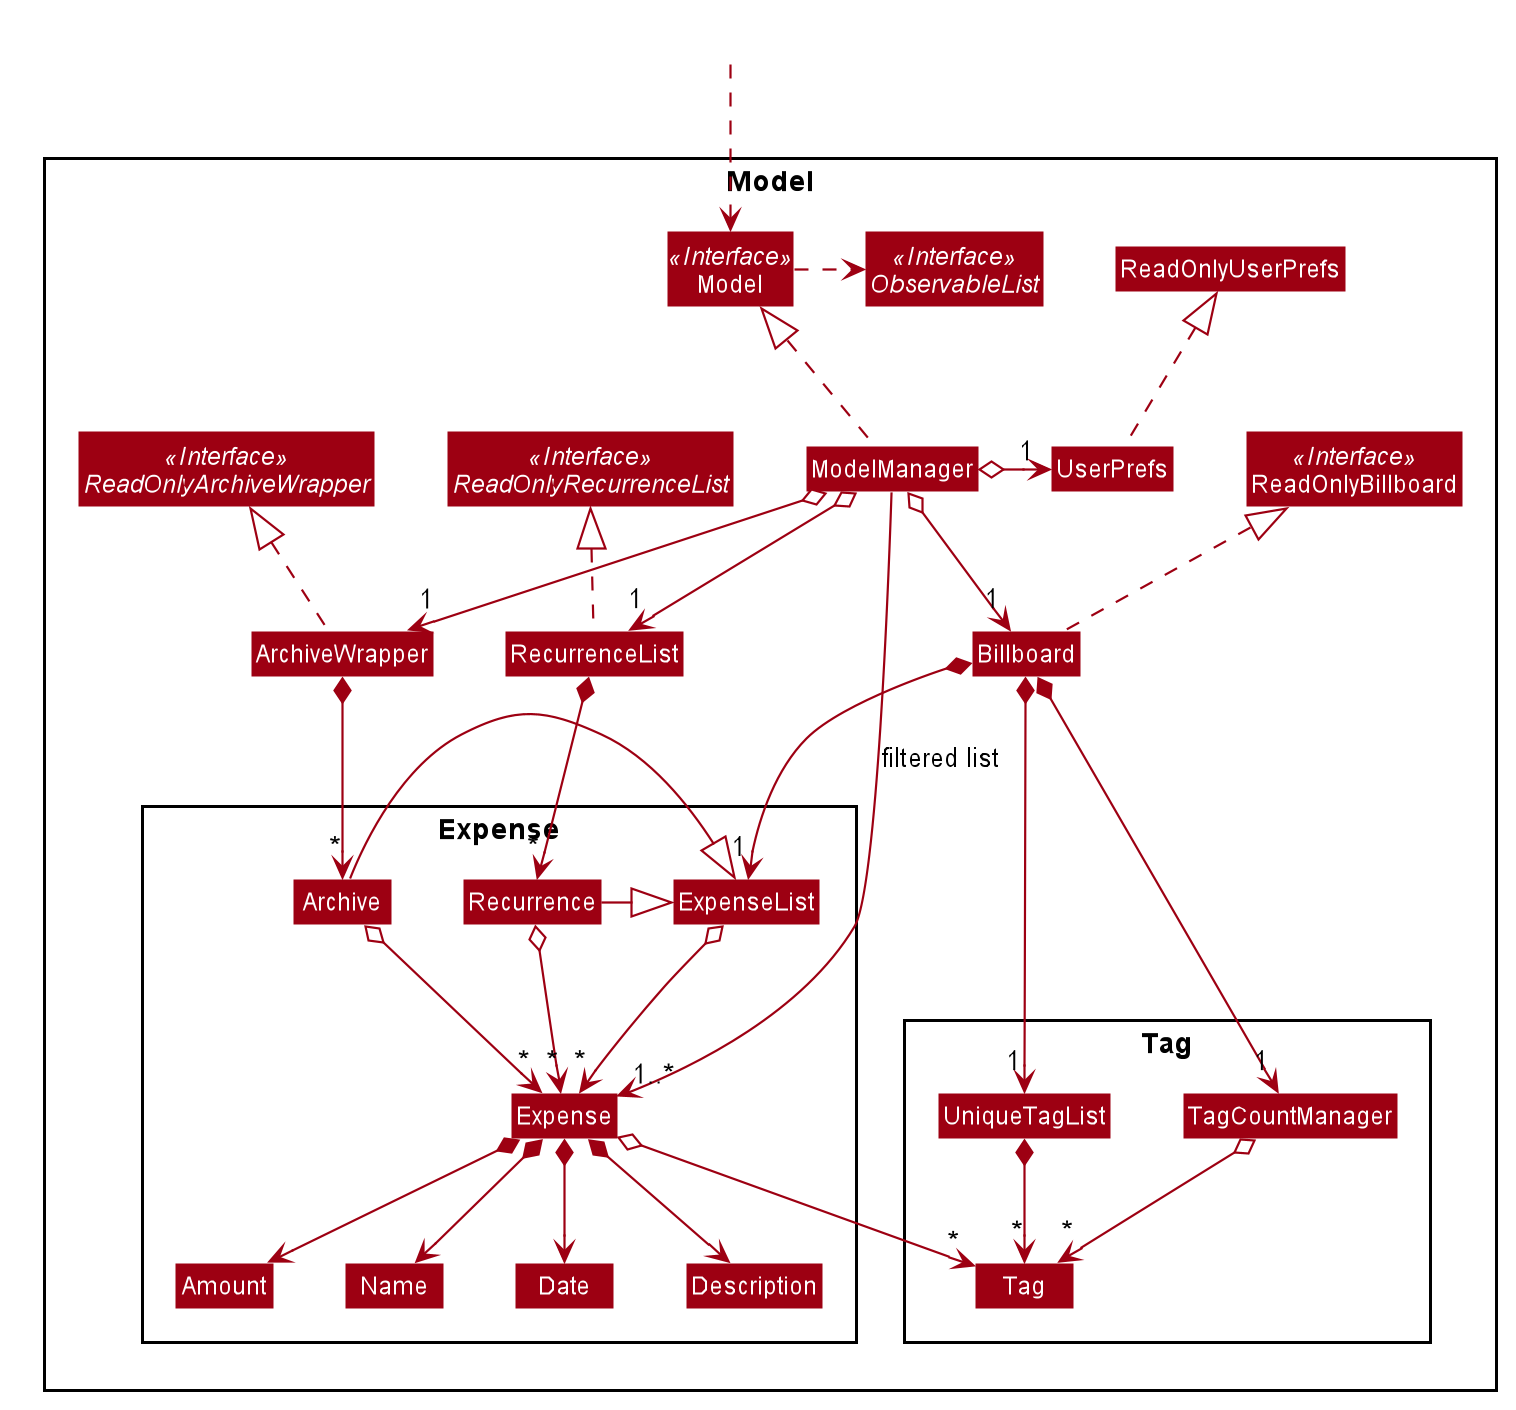
API : Model.java
The Model,
-
stores a
UserPrefobject that represents the user’s preferences. -
stores the Billboard and ArchiveWrapper data, i.e current expenses and archived past expenses.
-
stores
UniqueTagListandTagCountManagerto track tags. -
exposes an unmodifiable
ObservableList<Expense>that can be 'observed' e.g. the UI can be bound to this list so that the UI automatically updates when the data in the list change. -
does not depend on any of the other three components.
As a more OOP model, we can store a Tag list in Billboard, which Expense can reference. This would allow Billboard to only require one Tag object per unique Tag, instead of each Expense needing their own Tag object. An example of how such a model may look like is given below.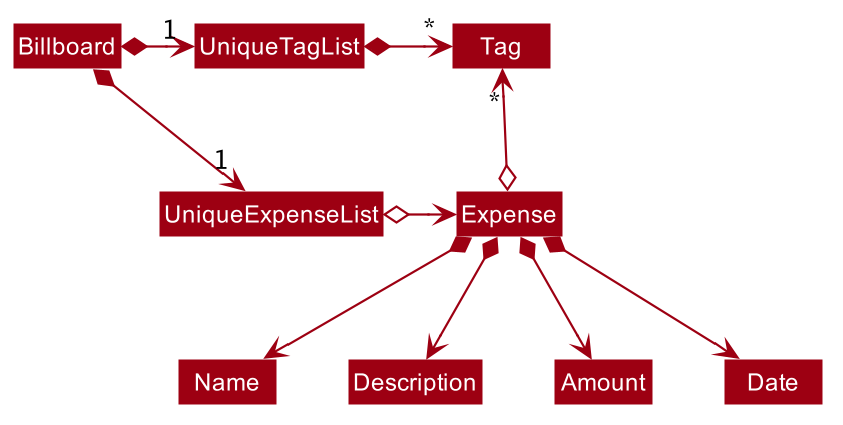
|
2.5. Storage component
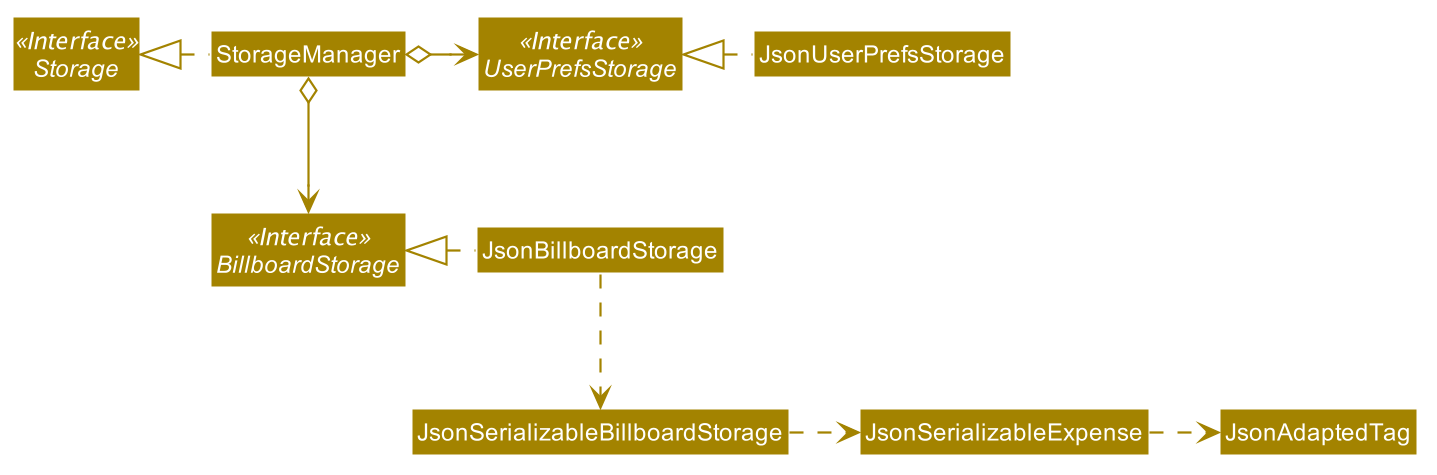
API : Storage.java
The Storage component,
-
can save
UserPrefobjects in json format and read it back. -
can save the Billboard data in json format and read it back.
2.6. Common classes
Classes used by multiple components are in the seedu.billboardbook.commons package.
3. Implementation
This section describes some noteworthy details on how certain features are implemented.
3.1. Undo/Redo feature
3.1.1. Implementation
The undo/redo mechanism is facilitated by VersionedBillboard.
If you successfully execute a command that will change the Billboard state,
the current Billboard state will automatically commit to the VersionedBillboard.
The current state will be store into the stateList,
and a state pointer currentStatePointer will be maintained.
 List of command that will commit to VersionedBillboard:
- AddArchiveCommand
- AddCommand
- AddTagCommand
- ClearCommand
- DeleteArchiveCommand
- DeleteCommand
- RevertArchiveCommand
- EditCommand
- RemoveTagCommand
Additionally, it implements the following operations:
-
VersionedBillboard#commit()— Saves the current billboard state in its history. -
VersionedBillboard#undo()— Restores the previous billboard state from its history. -
VersionedBillboard#redo()— Restores a previously undone billboard state from its history.
These operations is exposed in the VersionedBillboard class as VersionedBillboard#commit()., VersionedBillboard#undo() and VersionedBillboard#redo() respectively.
Given below is an example usage scenario and how the undo/redo mechanism behaves at each step.
Step 1. The user launches the application for the first time. The VersionedBillboard will be initialized with the initial billboard state, and the currentStatePointer pointing to that single billboard state.
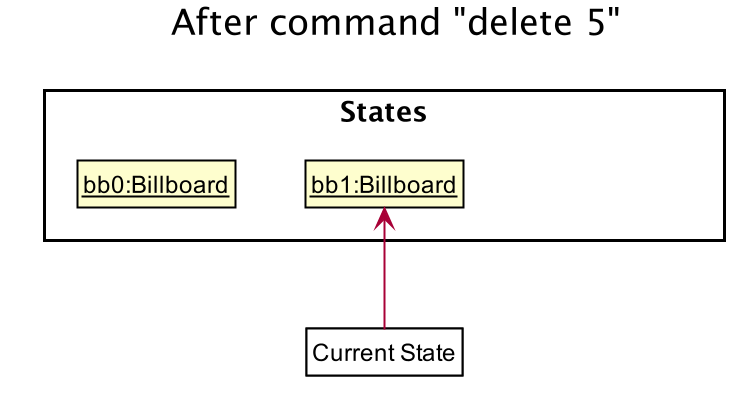
Step 2. The user executes delete 5 command to delete the 5th expense in the billboard. The delete command calls VersionedBillboard#commit(), causing the modified state of the billboard after the delete 5 command executes to be saved in the stateList, and the statePointer is shifted to the newly inserted billboard state.
Step 3. The user executes add n/buy … to add a new person. The add command also calls Model#commit(), causing another modified billboard state to be saved into the stateList.
If a command fails its execution, it will not call VersionedBillboard#commit(), so the billboard state will not be saved into the stateList.
|
Step 4. The user now decides that adding the expense was a mistake, and decides to undo that action by executing the undo command. The undo command will call VersionedBillboard#undo(), which will shift the currentStatePointer once to the left, pointing it to the previous billboard state, and restores the billboard to that state.

If the currentStatePointer is pointing to the initial billboard state,
then there are no previous billboard states to restore.
The undo command uses VersionedBillboard#isRedoable() to check if this is the case.
If so, it will return an error to the user rather than attempting to perform the undo.
|
The following sequence diagram shows how the undo operation works:
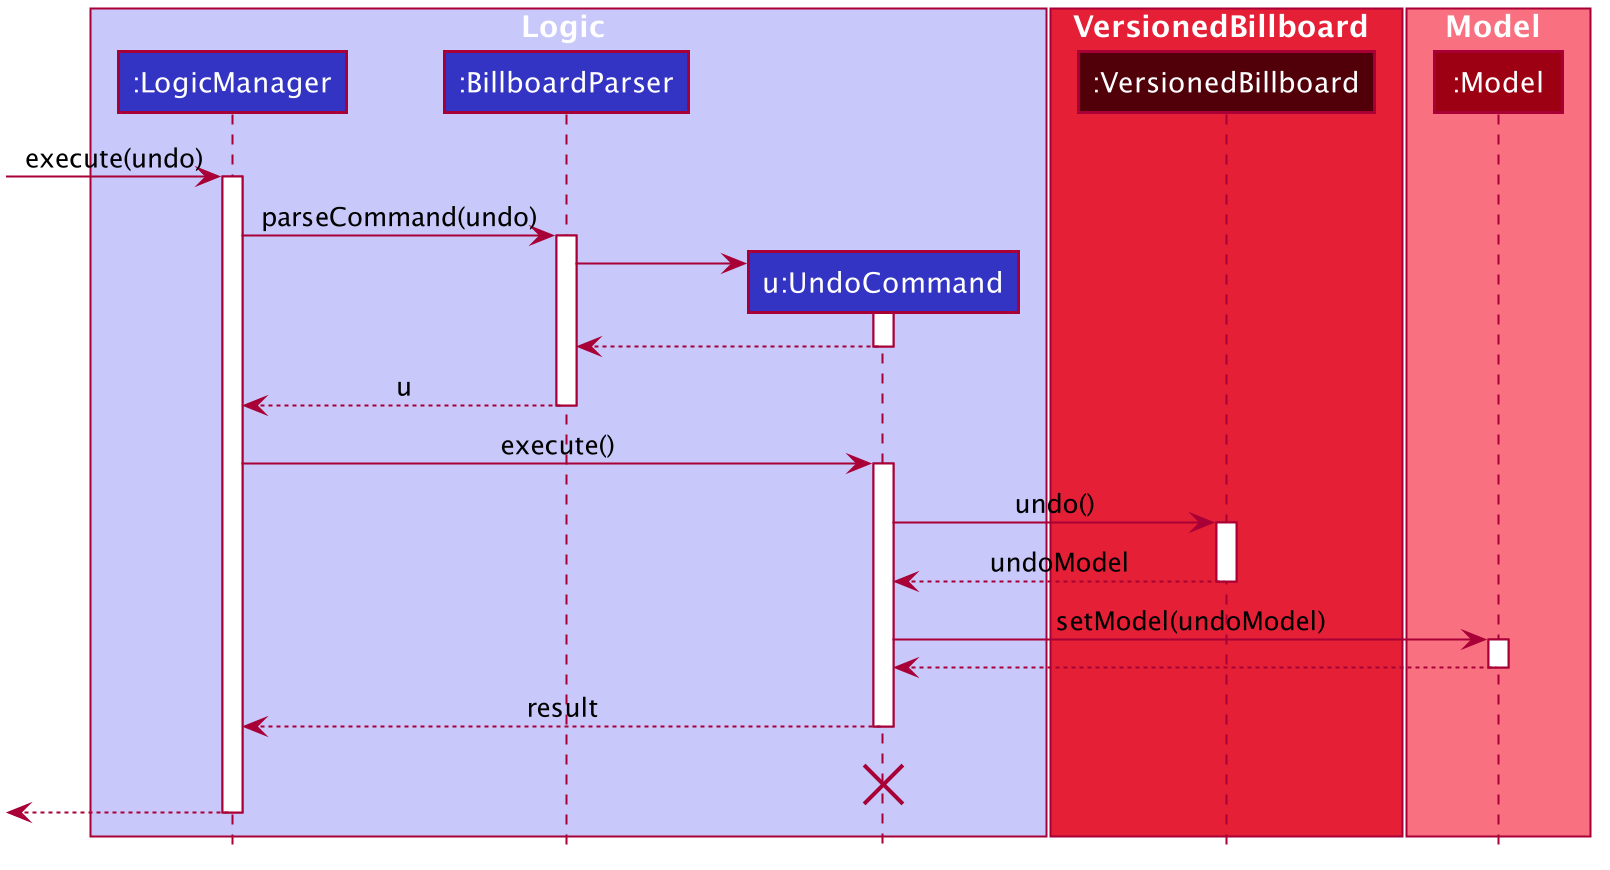
undo Command
The lifeline for UndoCommand should end at the destroy marker (X) but due to a limitation of PlantUML, the lifeline reaches the end of diagram.
|
The redo command does the opposite — it calls VersionedBillboard#redo(), which shifts the currentStatePointer once to the right, pointing to the previously undone state, and restores the billboard to that state.
If the currentStatePointer is at index stateList.size() - 1, pointing to the latest billboard state, then there are no undone billboard states to restore. The redo command uses VersionedBillboard#isRedoable() to check if this is the case. If so, it will return an error to the user rather than attempting to perform the redo.
|
Step 5. The user then decides to execute the command list. Commands that do not modify the billboard, such as list, will usually not call VersionedBillboard#commit(), VersionedBillboard#undo() or VersionedBillboard#redo(). Thus, the stateList remains unchanged.
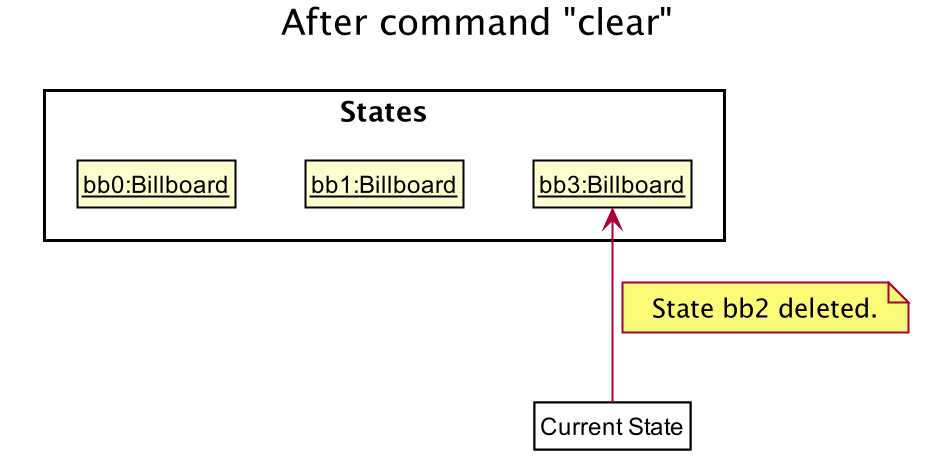
Step 6. The user executes clear, which calls VersionedBillboard#commit(). Since the currentStatePointer is not pointing at the end of the stateList, all billboard states after the statePointer will be purged. We designed it this way because it no longer makes sense to redo the add n/buy … command. This is the behavior that most modern desktop applications follow.
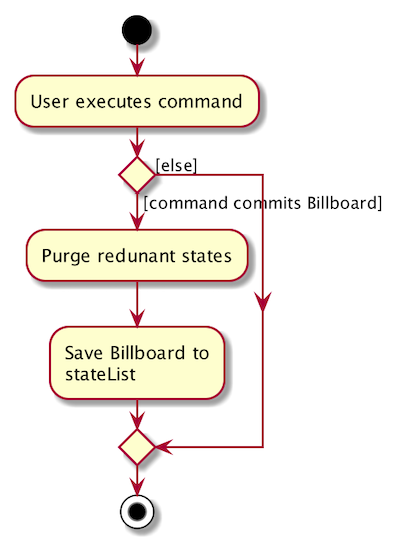
The following activity diagram summarizes what happens when a user executes a new command:
3.1.2. Design Considerations
Aspect: How undo & redo executes
-
Alternative 1 (current choice): Saves the entire billboard.
-
Pros: Easy to implement.
-
Cons: May have performance issues in terms of memory usage.
-
-
Alternative 2: Individual command knows how to undo/redo by itself.
-
Pros: Will use less memory (e.g. for
delete, just save the expense being deleted). -
Cons: We must ensure that the implementation of each individual command are correct.
-
Aspect: Data structure to support the undo/redo commands
-
Alternative 1 (current choice): Use a list to store the history of billboard states.
-
Pros: Easy for new Computer Science student undergraduates to understand, who are likely to be the new incoming developers of our project.
-
Cons: Logic is duplicated twice. For example, when a new command is executed, we must remember to update both
ModelandVersionedBillboard.
-
-
Alternative 2: Use
HistoryManagerfor undo/redo-
Pros: We do not need to maintain a separate list, and just reuse what is already in the codebase.
-
Cons: Requires dealing with commands that have already been undone: We must remember to skip these commands. Violates Single Responsibility Principle and Separation of Concerns as
HistoryManagernow needs to do two different things.
-
3.2. Archive
3.2.1. Implementation
Modelling Archive
The archive feature supports the following actions:
-
Creating an archive
-
Adding an expense to an archive
-
Reverting/"unarchiving" an archived expense
-
Deleting an archived expense
-
Displaying the list of expense of a particular archive
-
Listing all existing archive names
These actions are facilitated by the ArchiveWrapper and Archive classes:
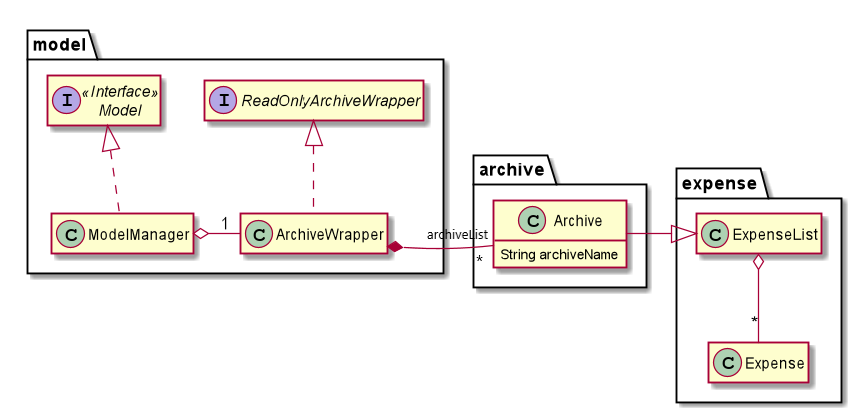
ArchiveWrapper and Archive classes-
Archiveextends fromExpenseListin order to encapsulate an archive name and a list of expenses together as an archive. -
ArchiveWrappermanages all existing archives and hashes eachArchiveobject to its archive name.
The implementation of the archive feature is located in the Model component in terms of the overall architecture of Billboard.
ArchiveWrapper is used in ModelManager to manage all archives. Its respective operations are called to access and manipulate archive expenses when an archive command is entered.
Such operations include:
-
ArchiveWrapper#AddArchive(Archive)- Adds the given archive to the current map of archive objects. -
ArchiveWrapper#HasArchive(String)- Checks if the specified archive by the given archive name exists. -
ArchiveWrapper#removeArchive(Archive)- Deletes the given archive from the current map of archive objects. (Assumes given archive already exists) -
ArchiveWrapper#hasArchiveExpense(String, Expense)- Checks if the specified archive by the given archive name has the given expense. -
ArchiveWrapper#addArchiveExpense(String, Expense)- Adds the given expense into the specified archive by the given archive name. (Assumes given archive already exists) -
ArchiveWrapper#removeArchiveExpense(String, Expense)- Deletes the given expense into the specified archive by the given archive name. (Assumes given archive and expense already exists) -
ArchiveWrapper#getArchiveNames()- Returns a set of all existing archive names
These operations are exposed in the Model interface respectively as:
-
Model#addArchive(Archive) -
Model#HasArchive(String) -
Model#deleteArchive(Archive) -
Model#hasArchiveExpense(String, Expense) -
Model#addArchiveExpense(String, Expense) -
Model#deleteArchiveExpense(String, Expense) -
Model#getArchiveNames()
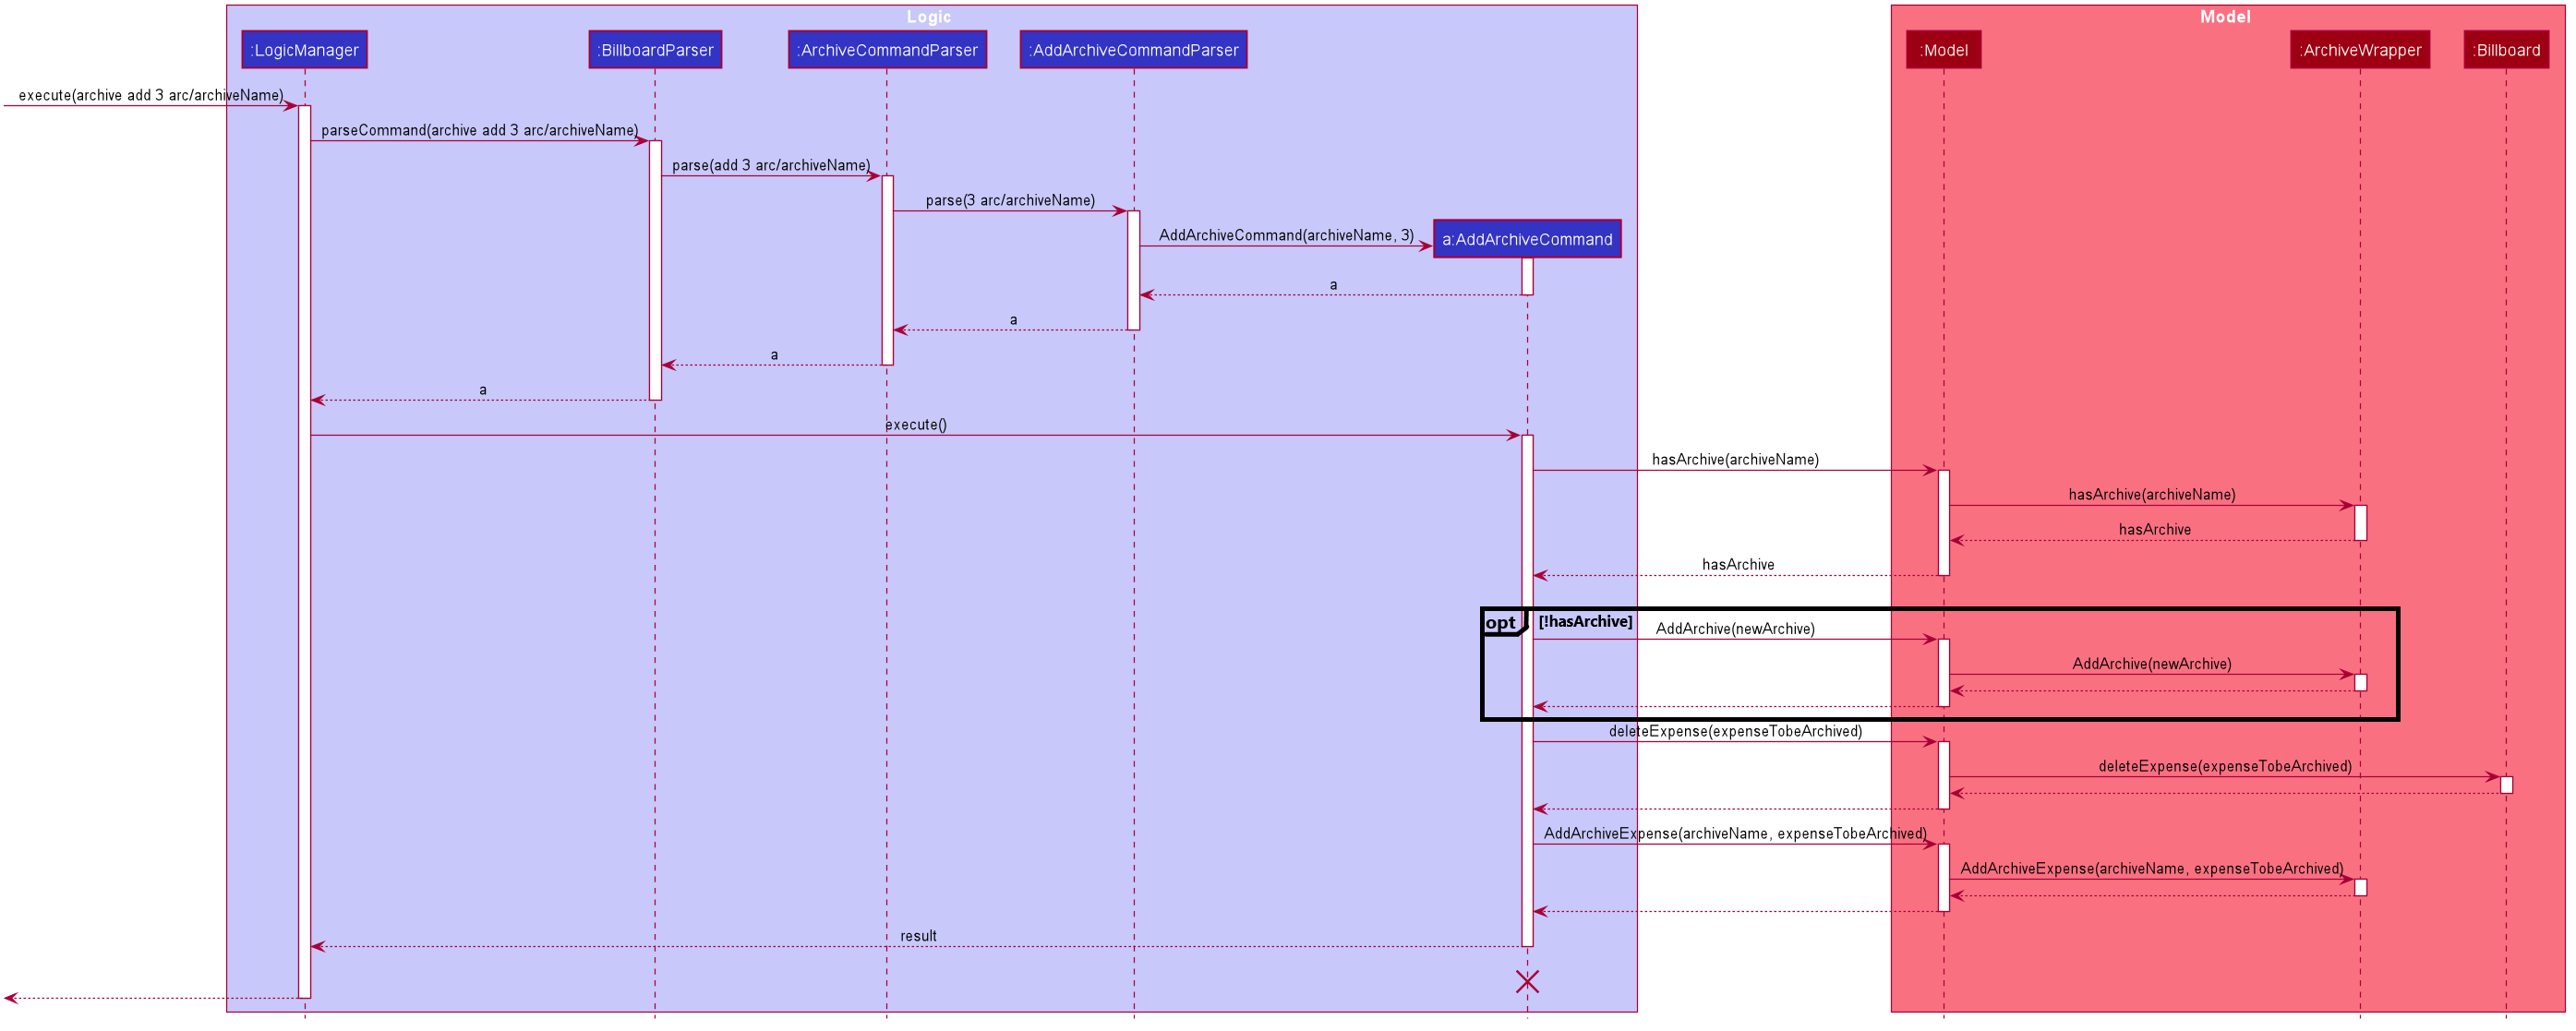
Given below is an example usage scenario of the add expense to archive function, showing how the command is parsed in Logic and how it interacts with Model:
Step 1. The user has the application running and has a non empty list of current expenses. The user can enter the list command to bring up
this list.
Step 2. The user executes the command archive add 3 arc/archiveName to archive an expense.
The command is first parsed by BillboardParser to determine what kind of general command it is. archive indicates it is an archive command so the remaining input is parsed through ArchiveCommandParser.
ArchiveCommandParser determines which archive command should be called. add indicates it is an add command, so the input is parsed for the final time through AddArchiveCommandParser to extract out the arguments entered for the operation.
In this case, the arguments are 3 and archiveName
This layered parsing process can be visualised below:
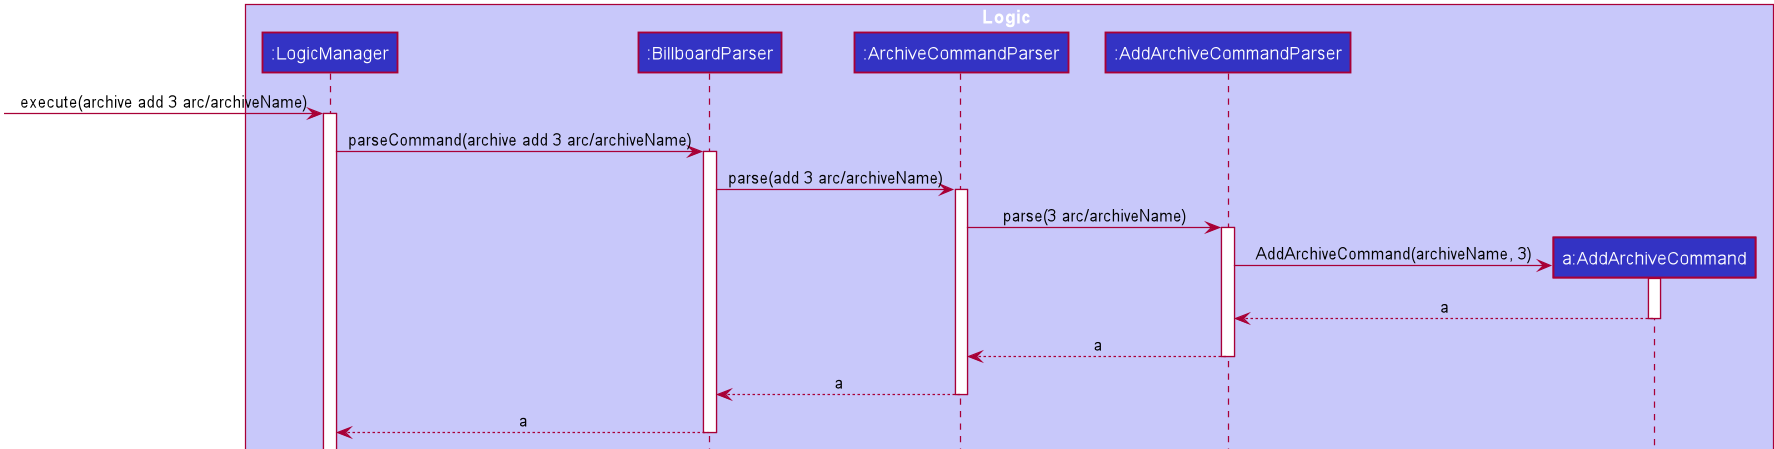
AddArchiveCommand in a cropped sequence diagramStep 3. AddArchiveCommandParser then returns an AddArchiveCommand object to be executed. The AddArchiveCommand performs two checks before executing any changes:
-
First, it is changed if entered index,
3, is a valid index from the current expense list. An exception is thrown and the command is aborted if the index is invalid, soModelis left unmodified in this case. -
Next, it is checked if the entered archive name,
archiveName, is an existing archive by callingModel#HasArchive(String). If the archive does not already exist, then a new archive is created with the given archive name usingModel#addArchive(Archive).
After the checks are completed and if no exception is thrown, the command executes the archiving of the expense through these steps:
-
The expense to be archived is first retrieved by
Model#getFilteredList()#get(int) -
The expense is then deleted from the list of current expenses by calling
model#deleteExpense(Expense) -
Next, the expense’s
archiveNamefield is updated usingExpense#archiveTo(String) -
Lastly, the expense is added to the specified archive using
Model#addArchiveExpense(String, Expense)
These interactions with Model by AddArchiveCommand can be shown in the cropped portion of the full sequence diagram below:
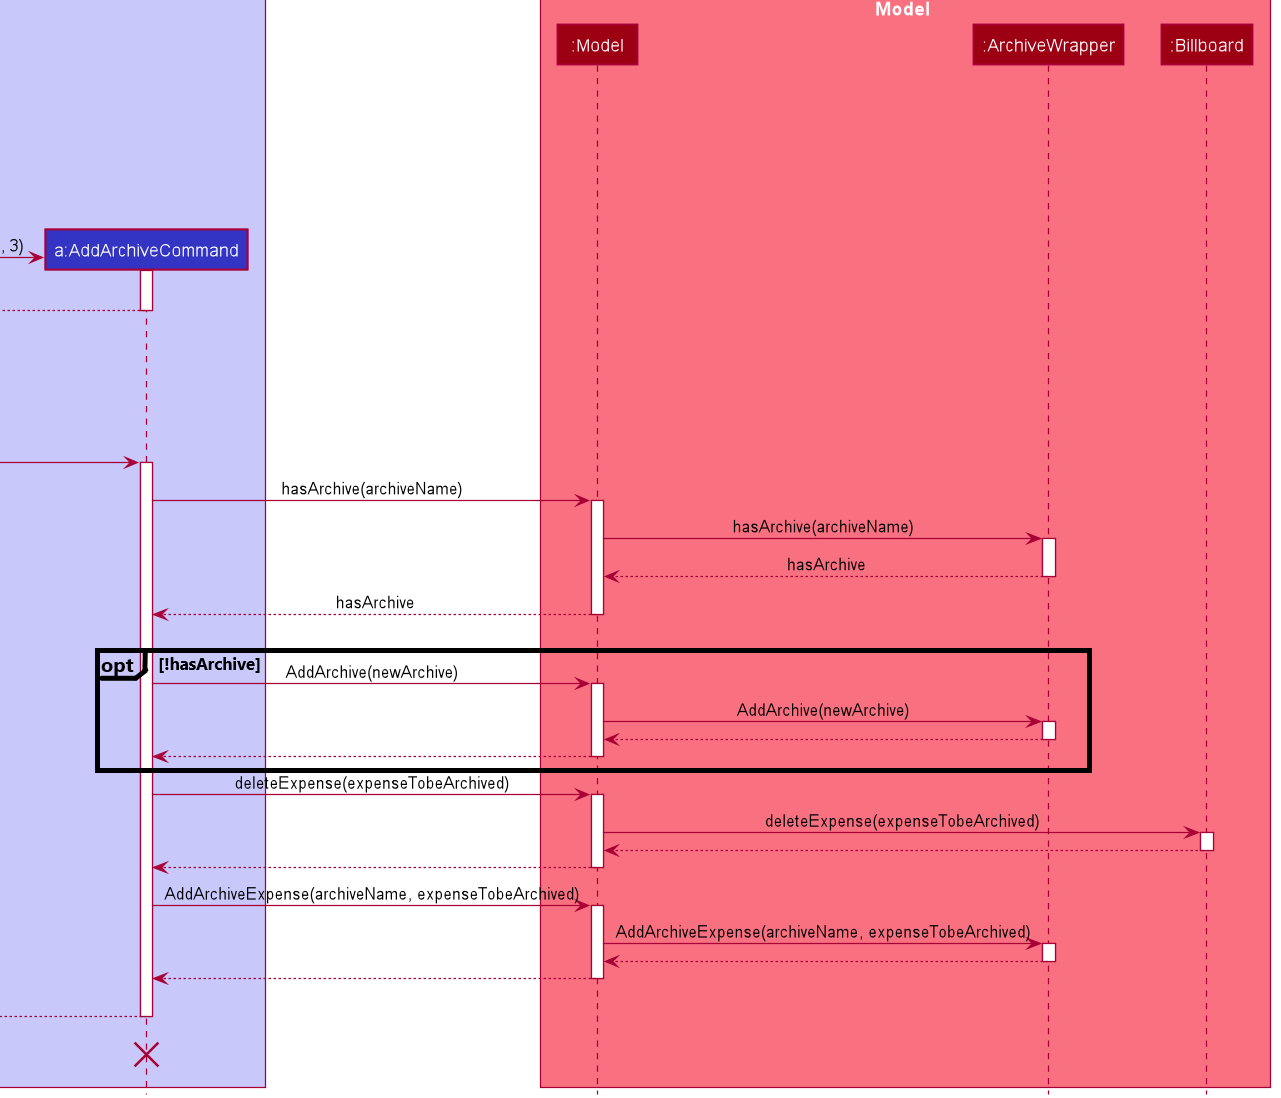
Model and AddArchiveCommand during the execution of the commandStep 4. Finally, a CommandResult object initialised with the add expense to archive success message is returned to indicate to the user that the operation was successful.
Full Sequence diagram of the operation:
The following activity diagram summarizes what happens when a user executes a new AddArchiveCommand:
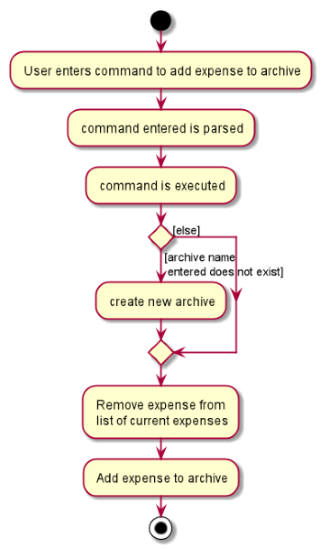
AddArchiveCommand activity diagramStoring Archive
All expenses, archived and non-archived, are stored in a single JSON file.
Upon start up of the application, all expenses are retrieved from JSON format and passed into
ModelManager as a combined Billboard object. During the initialization of ModelManager, the expenses in this Billboard object are filtered out into non-archived and
archived expenses by each Expense object’s archiveName field. The separate lists of non-archive and archive expenses are then used to initialize new Billboard and
ArchiveWrapper objects of ModelManager respectively. The Billboard object of ModelManager is used to maintain non-archive expenses.+
After each command is executed, the expenses in Model are saved into the JSON file. The method Model#getCombinedBillboard is called which collates all Expense objects
from its Billboard and ArchiveWrapper objects together into a single list and creates a new combined Billboard object. This combined Billboard is returned and used by
Storage to serialize into JSON format and writes it into the JSON file.
3.2.2. Design Considerations
Aspect: Data Structure to hold archives in ArchiveWrapper
-
Alternative 1 (Current implementation): Use of HashMap, mapping each archive name to its
Archiveobject-
Pros: Accessing data in a HashMap is instant. Therefore, retrieving an archive when performing add/delete archive expense operations or checking if an archive exists is fast.
-
Cons: As
ArchiveWrapperis initialized with a single list of archiveExpenseobjects, the initialization process is slower as this given list needs to be iterated through to filter eachExpenseobject into their respectiveArchiveobjects in the HashMap.
-
-
Alternative 2: Use a single list to store all archive expenses
-
Pros: Initialization of
ArchiveWrapperis fast, as the given list of archive expenses need not be processed. -
Cons: Some operations, like delete archive expense or get all archive names, are slower as the entire list must be iterated through each time in the worst case scenario. For example, to check if an expense exists in a particular archive, the entire list must be iterated if the expense to be found is at the end of the list.
-
Aspect: Storing archives
-
Alternative 1 (Current implementation): Storing non-archive and archive expenses together
-
Pros: No new storage classes need to be implemented, as this implementation uses the existing classes only.
-
Cons: Initialization process of
ModelManageris slower as the expenses need to be filtered into archive and non-archive expenses first.
-
-
Alternative 2: Storing archive expenses as
Archiveobjects in a separate file-
Pros: Initialization process of
ModelManageris faster, as itsArchiveWrapperobject can be initialized directly with the list ofArchiveobjects retrieved from the JSON file. No filtering of archive and non-archive expense from the same list is needed. -
Cons: More difficult to implement, as more JSON storage classes must be added and knowledge on serialising and deserialising new objects is needed.
-
3.3. Tagging
3.3.1. Proposed Implementation
The tag feature supports the following operations:
-
Adding tags to an expense
-
Removing tags from an expense
-
Filtering expenses by tags
-
Listing all existing tags
These actions are facilitated by the UniqueTagList and TagCountManager classes:
-
UniqueTagListmapsStringtoTagwhereStringis the name of theTag. It ensures that the sameTagobject is referenced instead of creating manyTagobjects of the same name during operations. -
TagCountManagermapsTagtoInteger, whereIntegeris the number ofExpensetagged with eachTag. It allowsTagobjects that are not tagged with anyExpenseto be tracked and removed.
Operations include:
-
UniqueTagList#retrieveTags(List<String>)— Retrieves corresponding tags fromUniqueTagListbased on the list of tag names. -
UniqueTagList#removeAll(List<Tag>)— Removes tags given in the list from theUniqueTagList. -
UniqueTagList#getTagNames()— Returns a list of existing tag names. -
TagCountManager#incrementAllCount(Set<Tag>)— Increments theIntegermapped to the tags in the set by 1. -
TagCountManager#decreaseAllCount(Set<Tag>)— Decreases theIntegermapped to the tags in the set by 1. -
TagCountManager#removeZeroCount()— Removes all mappings where theIntegeris equal to 0.
These operations are exposed in the Model interface as:
-
Model#retrieveTags(List<String>) -
Model#incrementCount(Set<Tag>) -
Model#decreaseCount(Set<Tag>)—TagCountManager#removeZeroCount()andUniqueTagList#removeAll(List<Tag>)are called in this method to remove any tag not tagged to any expense from theUniqueTagListandTagCountManager. -
Model#getTagNames()
Given below is an example usage scenario and how adding tag executes at every step.
-
Step 1: The user launches the application. The
Modelis initialized with saved data. All tags are loaded intoUniqueTagListandTagCountManager. -
Step 2: User enters the command
tag add 1 t/test t/test2to add tags to theExpenseat index 1 in Billboard.
2a.BillboardParserparses this command, creating aTagCommandParserafter determining that it is a tag command.
2b. TheTagCommandParserthen parsesadd 1 t/test t/test2and creates anAddTagCommandParserafter determining that it is a command to add tags.
2c. Subsequently, theAddTagCommandParserparses1 t/test1 t/test2intoIndex1 and a list ofStringconsisting oftest1andtest2.AddTagCommandParsercreatesAddTagCommandwith theIndexand list ofStringas parameters. -
Step 3:
LogicManagerexecutes theAddTagCommand.
During execution,
3a.AddTagCommandcallsModel#retrieveTags(List<String>)on the list ofStringconsisting oftest1andtest2which returns a set ofTagwith tag namestest1andtest2.
3b.AddTagCommandthen callsModel#incrementCount(Set<Tag>)on the set ofTag.
3c. Lastly,AddTagCommandcallsModel#setExpense(Expense, Expense)which edits and updates theExpenseat index 1 in theModel. The updatedExpenseis then reflected on the GUI.
Duplicate tags in an Expense is not allowed.If the user tries to add an existing Tag to an Expense, AddTagCommand throws an exception, leading to an error message.If the user tries to add duplicate Tag, i.e enter 2 of the same Tag, AddTagCommand adds the tag once and increments the number of expenses tagged to it by 1.
|
The following sequence diagram shows how the adding tag operation works.
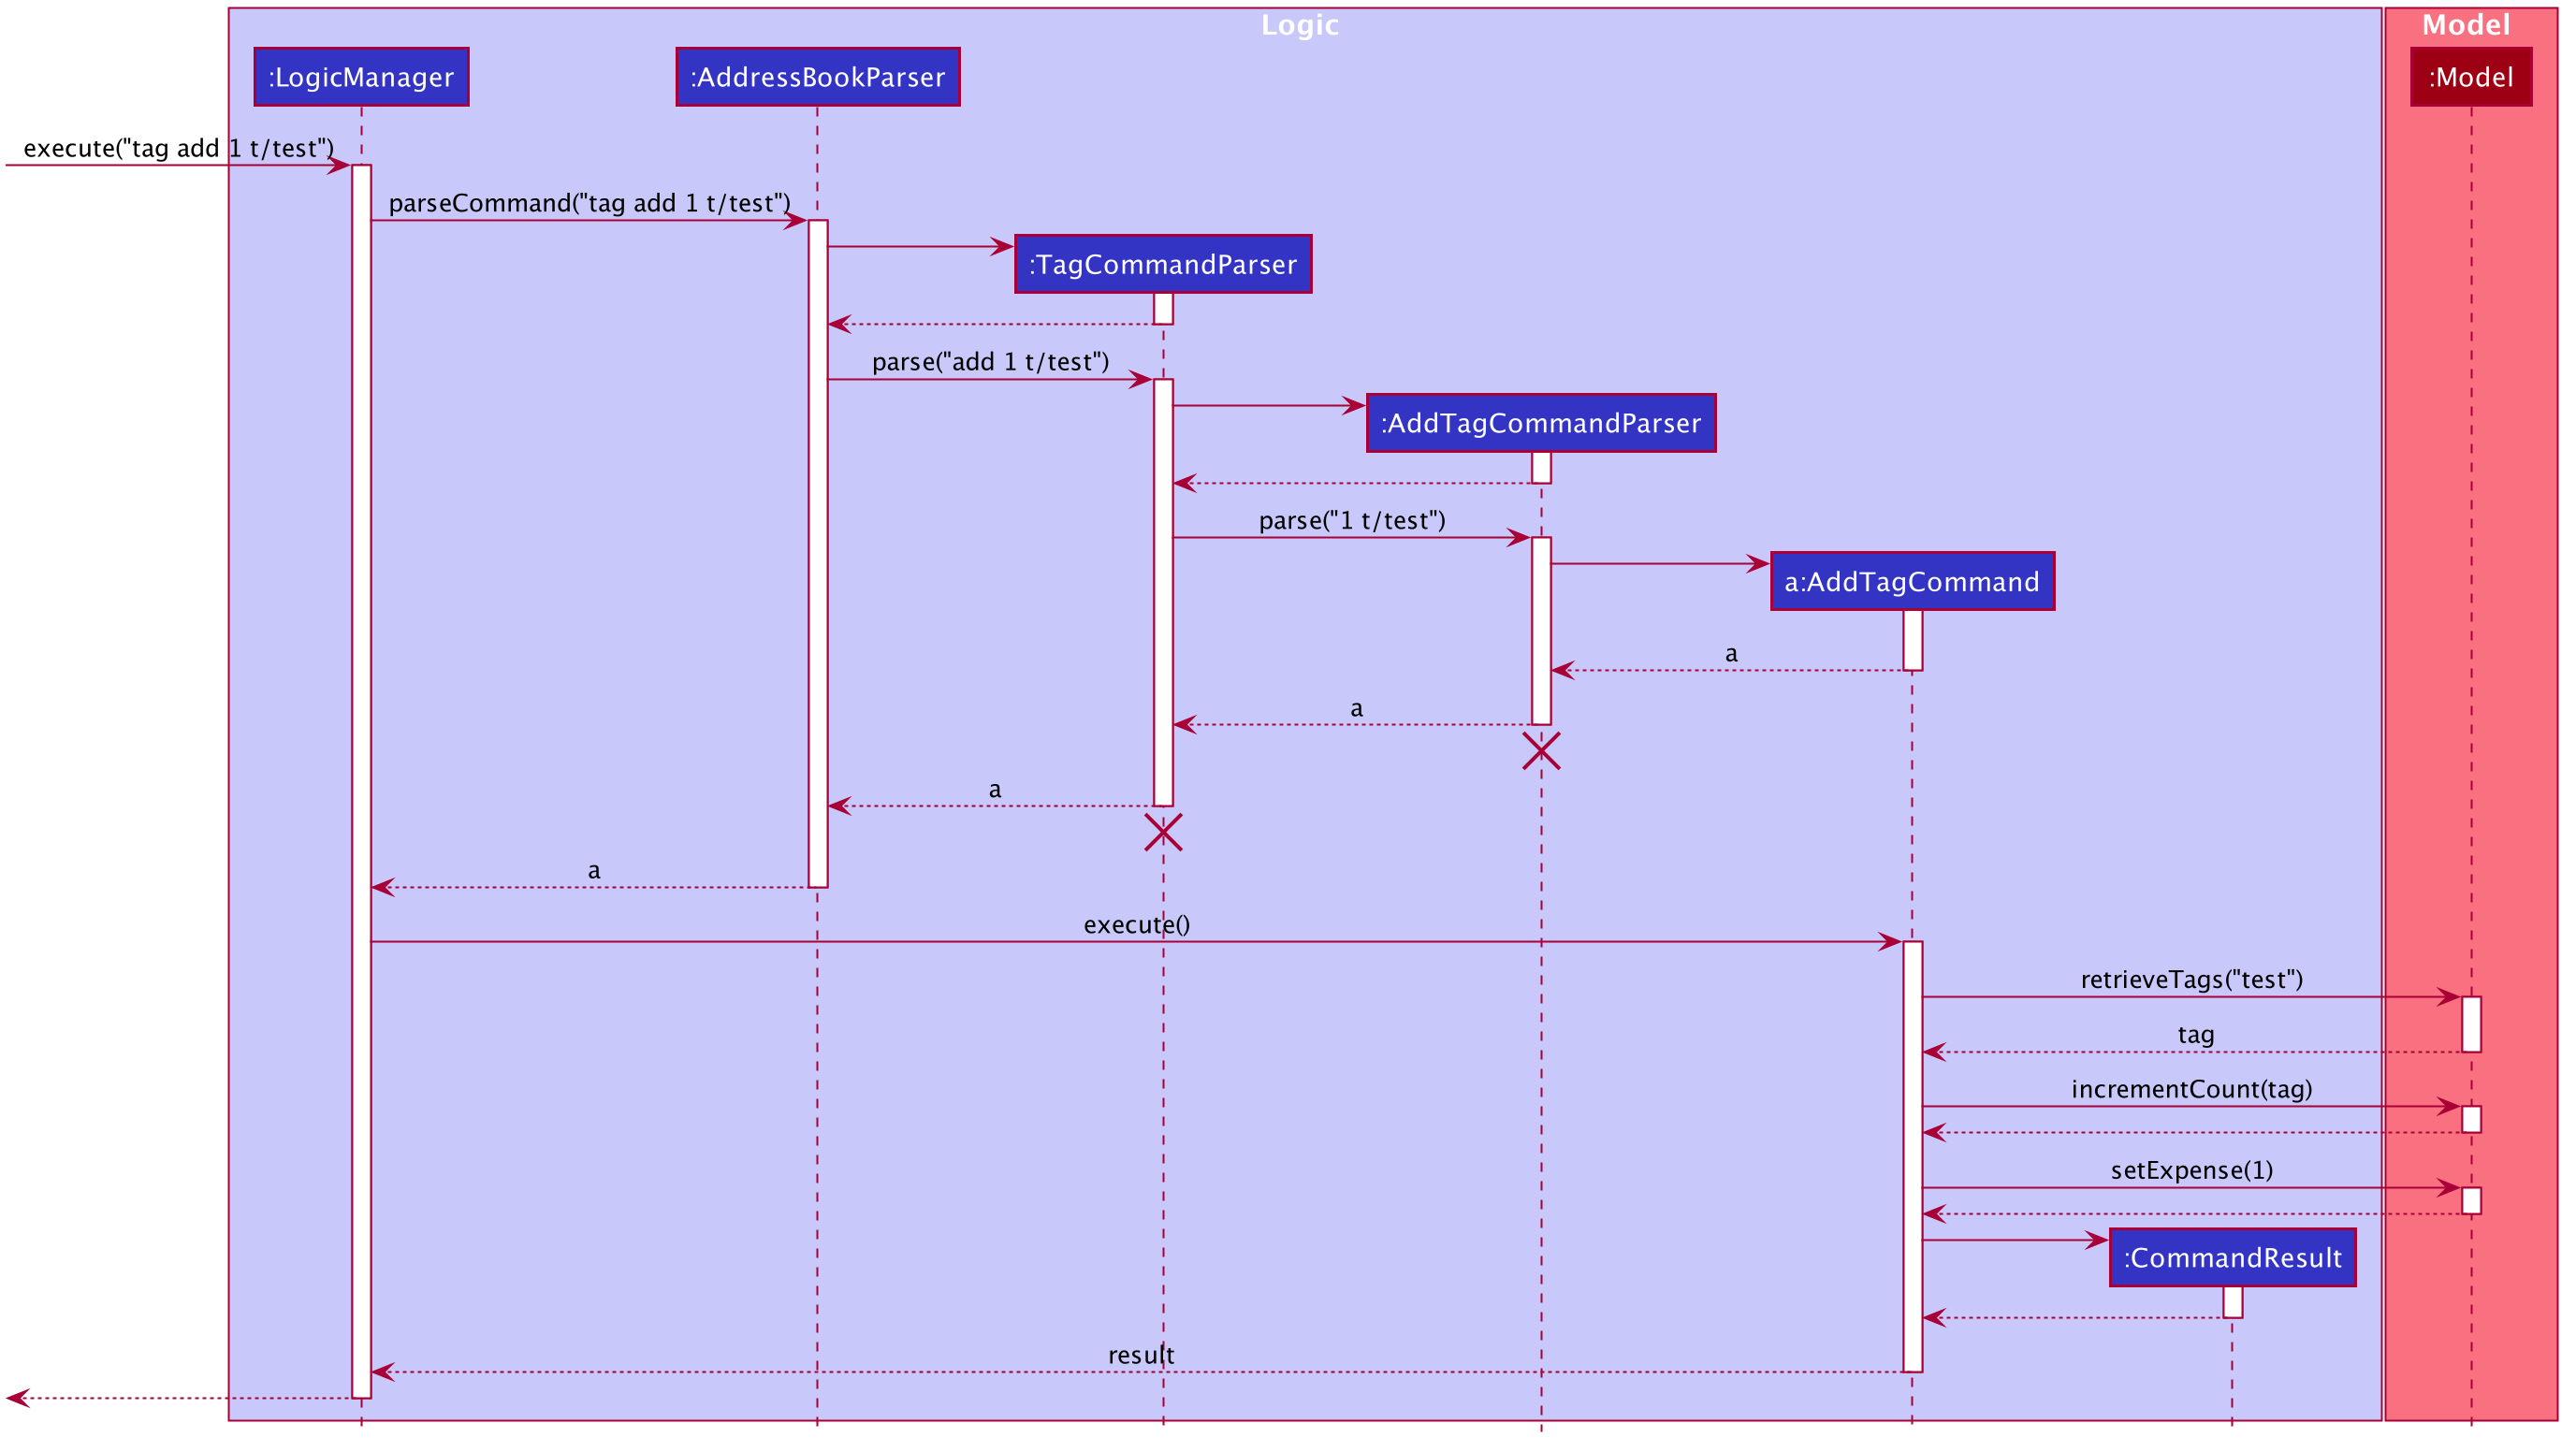
Figure 21. Sequence diagram of executing AddTagCommand.
The lifeline for TagCommandParser and AddTagCommandParser should end at the destroy marker (X) but due to a limitation of PlantUML, the lifeline reaches the end of diagram.
|
The following activity diagram summarizes what happens when a user enters a command to add tags to an expense.
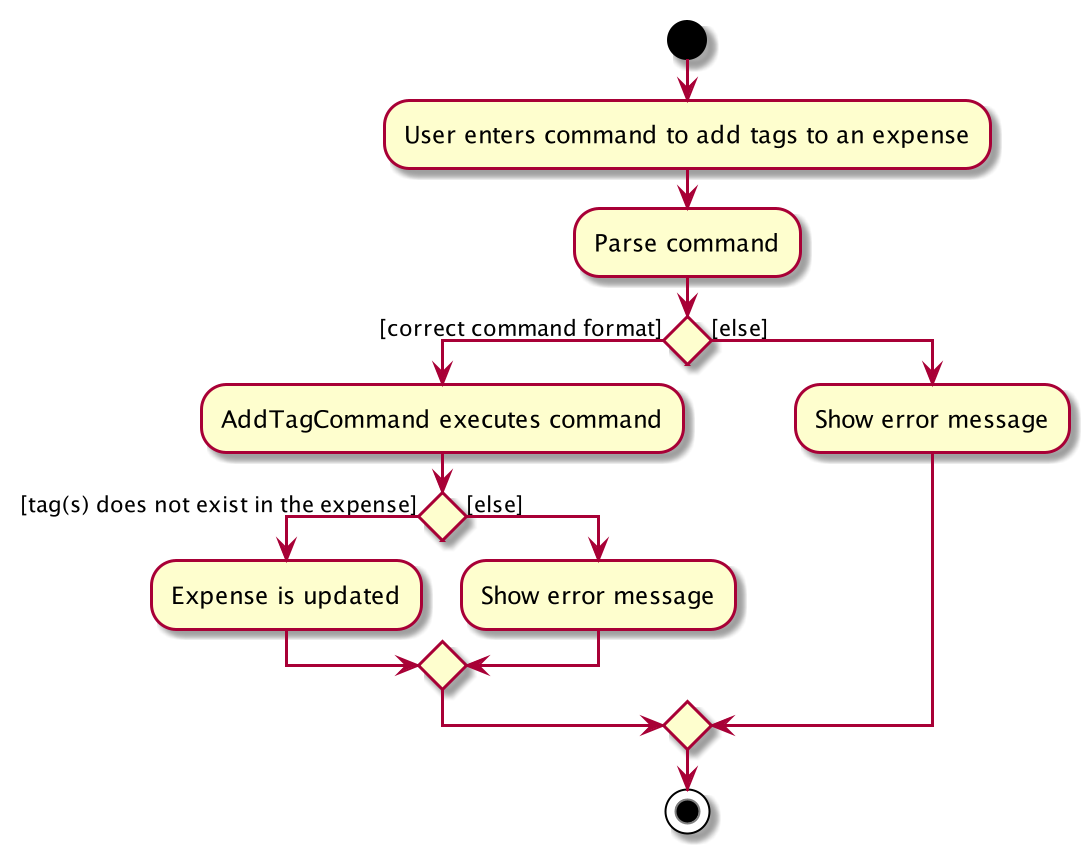
Figure 22. Activity diagram of executing AddTagCommand.
3.3.2. Design Considerations
Aspect: Data structure to support tag commands
-
Alternative 1 (current choice): Use a
UniqueTagListto map tag names toTagandTagCountManagerto mapTagto number ofExpensetagged to it.-
Pros:
-
Each structure has only one responsibility.
-
Fast retrieval and update of data
-
-
Cons:
-
Requires maintenance of both structures as they need to sync with each other.
-
Retrieval of all
Expenseunder aTagrequires filtering through the whole list ofExpense.
-
-
-
Alternative 2 : Have each
Tagstore a list ofExpensetagged to it.-
Pros:
-
Fast retrieval of all
Expensesunder eachTag
-
-
Cons:
-
Circular dependency
-
Since implementation of Billboard objects are immutable, there is a constant need to update the
Expensein the list even after executing non-tag related commands.
-
-
-
Alternative 3 : Use one map to map
TagtoExpensetagged to it.-
Pros:
-
Fast retrieval of all
Expensesunder eachTag
-
-
Cons:
-
Since implementation of Billboard objects are immutable, there is a constant need to update the
Expensein the list even after executing non-tag related commands.
-
-
3.4. [Enhanced] Find
3.4.1. Proposed Implementation
The find feature supports the finding expenses by any combination of the following conditions:
-
Keywords
-
Lower/upper amount limit
-
Lower/upper creation date limit
These actions are facilitated by the MultiArgPredicate class:
-
MultiArgPredicateimplements thePredicateinterface. It enables filtering of expenses by multiple attributes through keeping track of a set of predicates that can be applied when prompted by user input.
Operations include:
-
MultiArgPredicate#setKeywords(List<String>)— Set list of keywords to search by. -
MultiArgPredicate#setDateRange(CreatedDate, CreatedDate)— Set start date and end date limit to search by. -
MultiArgPredicate#setAmtRange(Amount, Amount)— Set upperLimit and lowerLimit of amount of expenses to search by.
Given below is an example usage scenario and how the find mechanism behaves at each step.
Step 1.
The user launches the application. The Model is initialized with saved data. All expenses are loaded into FilteredList.
Step 2.
User enters the command find d/keywords a/lowerAmtLimit al/upperAmtLimit sd/startDate ed/endDate to find expenses that matches conditions set by user input. BillboardParser parses the command, creating a FindCommandParser.
The FindCommandParser then parses find d/keywords a/lowerAmtLimit al/upperAmtLimit sd/startDate ed/endDate to create a MultiArgPredicate inputted with the different filter parameters.
The MultiArgPredicate is then used to create the FindCommand.
Step 3.
LogicManager executes the FindCommand. During execution, FindCommand calls Model#updateFilteredExpenses(Predicate<Expense>) on the list consisting of test1 and test2 which returns a set of Tag.
Model#incrementCount(Set<Tag>) is then called on the set of Tag. The 1st Expense is edited and updated in the Model using Model#setExpense(Expense, Expense) and is then shown on the UI.
| If the user tries to input 2 conditions of the same prefix, only the last condition will be used. |
3.4.2. Design Considerations
Aspect: Data structure to support enhanced find command
-
Alternative 1 (current choice): Use a
MultiArgPredicateto filter selected expense from theFilteredList.MultiArgPredicateholds and combines a set of predicates of various types into a single predicate. Set of predicates can but do not need to includeAllContainsKeywordsPredicate,AmountWithinRangePredicateandDateWithinRangePredicate.-
Pros:
-
Only one variation of input command required.
-
No need for different kinds of find commands to handle filtering by different attribute.
-
No need for different kinds of find command parsers to handle parsing of different variations of input command.
-
-
Cons:
-
Higher complexity of code in FindCommandParser.
-
User need to use prefix to indicate type of conditions inputted.
-
Additional predicate
MultiArgPredicaterequired to handle filtering by more than one condition.
-
-
-
Alternative 2 :
FindCommandParsermaps input command to individual type of predicate that is used to create find command.-
Pros:
-
Commands are simpler and shorter.
-
-
Cons:
-
Limited functionality - can only find by one condition.
-
Use of different types of find commands.
-
-
3.5. Recurring Expenses
3.5.1. Proposed Implementation
The recurring expenses feature supports the adding of recurring expenses into Billboard. Recurring expenses have a start date and a end date. The date of the first expense will be the start date, and subsequent expenses will defer from the previous expenses by a date interval specified by the user. The recurring expense feature supports the following operations:
-
Listing all the recurrences
-
Adding a new recurrence which will add recurring expenses to the list of expenses
-
Editing an existing recurrence [Coming in V2.0]
-
Deleting an existing recurrence [Coming in V2.0]
These actions are facilitated by the Recurrence and RecurrenceList classes:
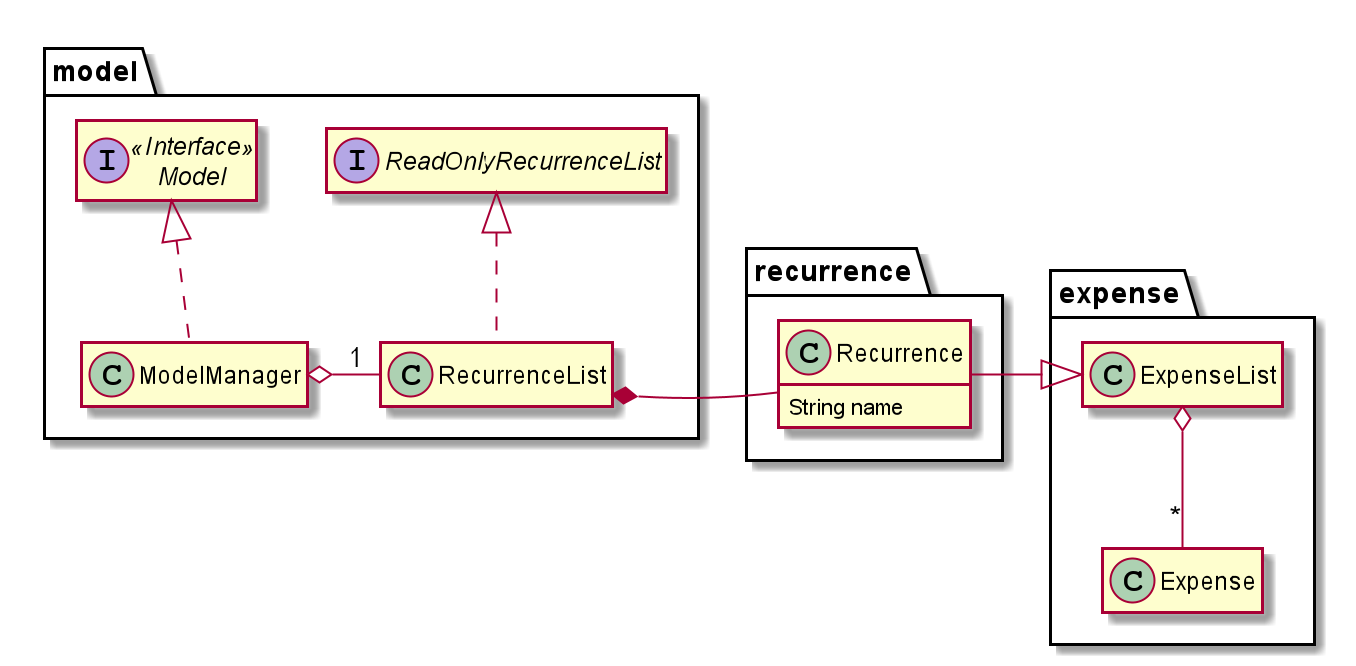
RecurrenceList is used in ModelManager to manage all recurrences. Its respective operations are called to access and manipulate recurrence expenses when an recurrence command is entered.
Such operations include:
-
RecurrenceList#add(Recurrence)- Adds the given recurrence to the current list of recurrence objects. -
RecurrenceList#contains(Recurrence)- Checks if the specified recurrence by the given recurrence name exists. -
RecurrenceList#remove(Recurrence)- Deletes the given recurrence from the current list of recurrence objects. (Assumes given recurrence already exists) -
RecurrenceList#setRecurrence(Recurrence, Recurrence)- Set existing recurrence to new recurrence -
RecurrenceList#setRecurrences(RecurrenceList)- Set the list of recurrences to the given recurrence list -
RecurrenceList#setRecurrences(List<Recurrence>)- Set the list of recurrences to the given recurrence list
These operations are exposed in the Model interface respectively as:
-
Model#addRecurrence(Recurrence) -
Model#hasRecurrence(String) -
Model#removeRecurrence(Recurrence) -
Model#removeRecurrence(int) -
Model#setRecurrences(RecurrenceList) -
Model#setRecurrences(List<Recurrence>) -
Model#getRecurrences()
Given below is an example usage scenario and how the recurrence mechanism behaves at each step.
Step 1.
The user launches the application. The Model is initialized with saved data. All expenses are loaded into FilteredList. No recurrence data is saved for now so model starts with an empty RecurrenceList
Step 2.
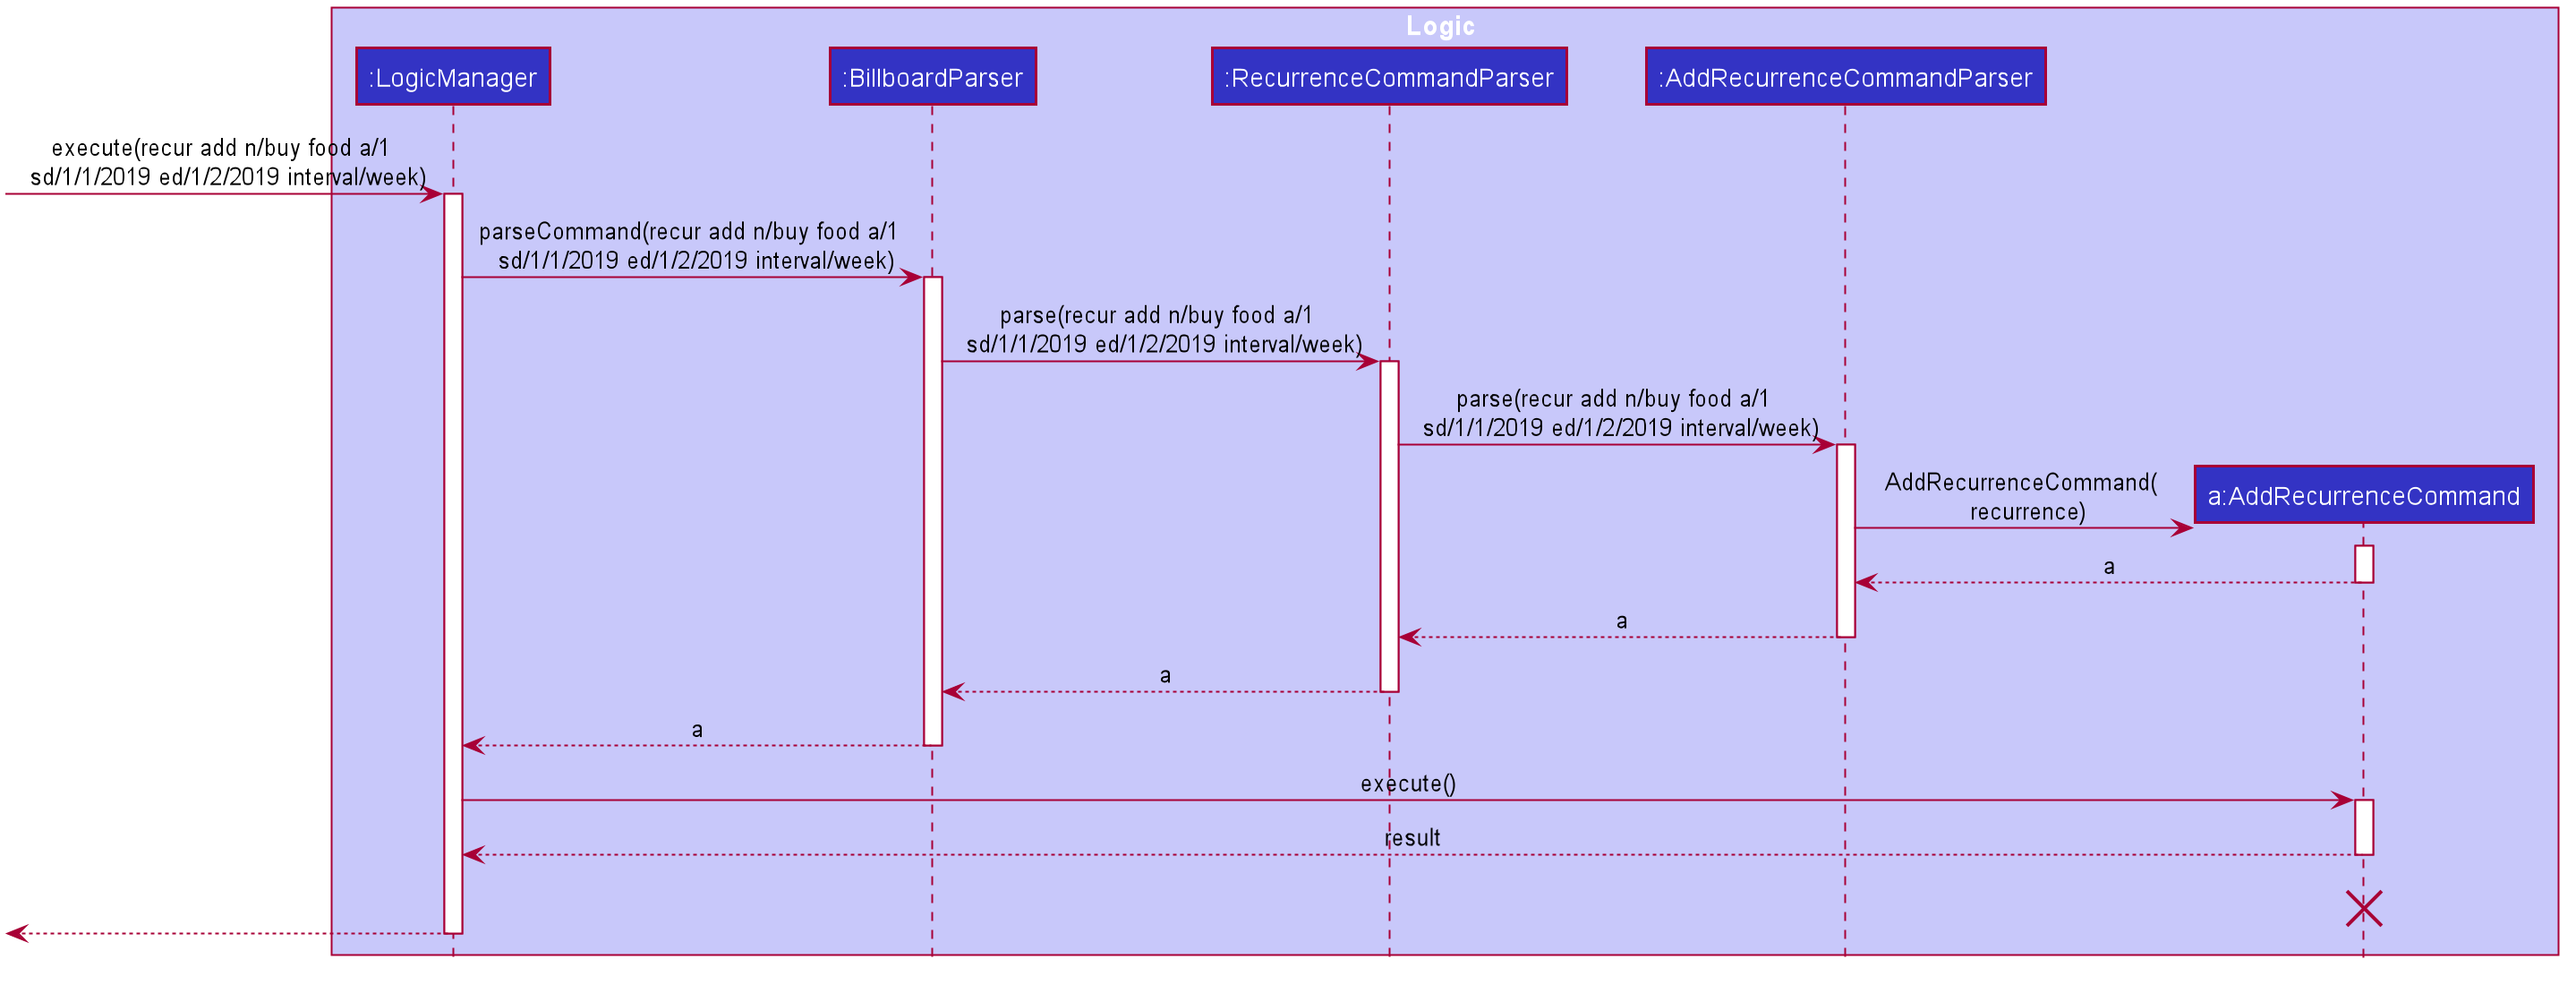
User enters the command recur add n/name d/description a/amount sd/startDate ed/endDate interval/interval to add recurring expenses that matches conditions set by user input. BillboardParser parses the command, creating a RecurringCommandParser.
The RecurringCommandParser then parses add n/name d/description a/amount sd/startDate ed/endDate interval/interval to create a AddRecurrenceCommandParser to parse all the variables.
The variables are then used to create the AddRecurrenceCommand.
The layered parsing process can be visualised below:
Step 3.
LogicManager executes the AddRecurrenceCommand. During execution, AddRecurrenceCommand calls Model#addRecurrence(Recurrence) and Model#addExpense(Expense)`on the new recurrence and expenses created.
`Model#incrementCount(Set<Tag>) is then called on the set of Tag. The expense are then updated and shown on the UI.
The following activity diagram summarizes what happens when a user executes a new AddRecurrenceCommand:
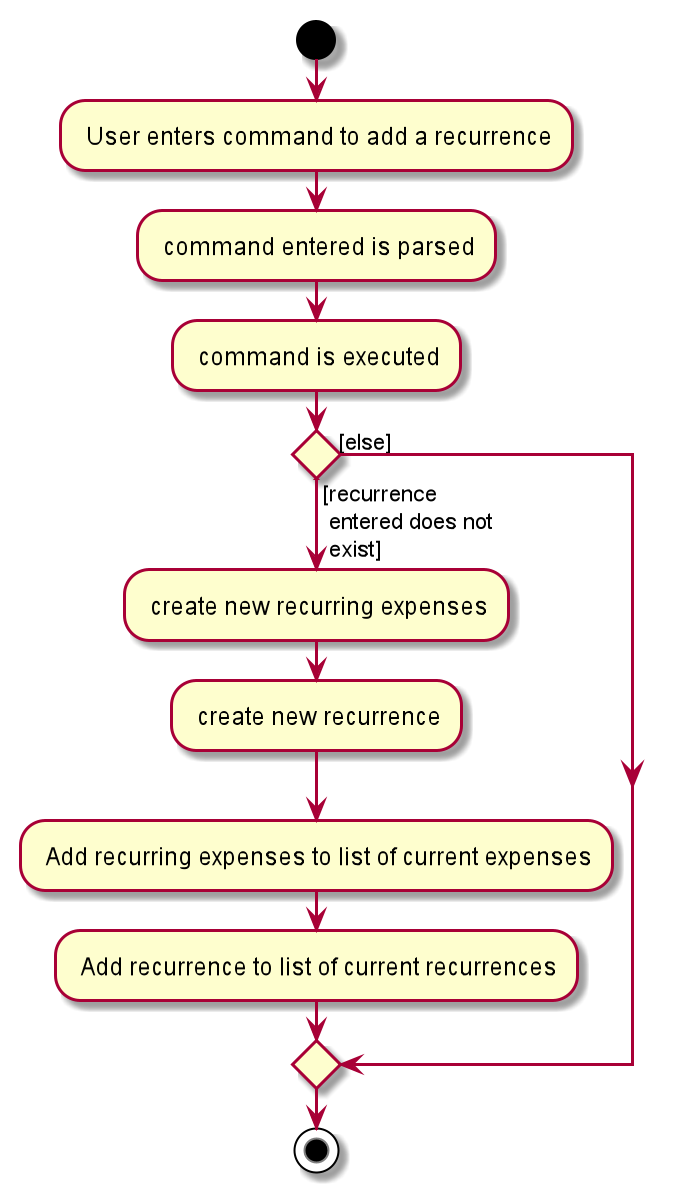
AddRecurrenceCommand activity diagram3.6. Statistics
Billboard includes a dynamically updating statistics panel containing a chart. It has the following functionality:
-
Every time the displayed list of expenses changes, the chart automatically updates with the new changes
-
Users can submit commands to change the displayed chart as well as change configuration options for the charts
This functionality is made possible through the statistics module. The statistics module is in charge of generating statistics from the currently displayed expenses and rendering it onto the main window. There are 2 components that help to do this - the chart component and the statistics generator component.
3.6.1. Chart component
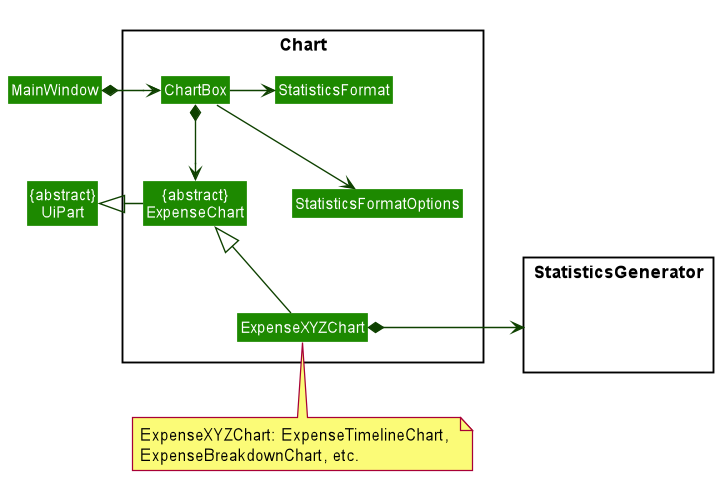
There is a special Chart component that deals with the generation and rendering of specific charts based on user input and the expenses being displayed.
The ChartBox is the main orchestrating class. It is updated with the latest StatisticsFormat and StatisticsFormatOptions that the user selects, via the MainWindow.
These are classes that represent user configuration on what to be displayed. Upon being updated, it creates the appropriate
ExpenseChart with the selected options, to display the selected statistic based on the currently displayed expenses. To transform the data from
the displayed list of expenses to the statistic format required, the StatisticsGenerator component is used. The concrete ExpenseChart obtains the formatted statistics from the
StatisticsGenerator component.
3.6.2. Statistics Generation Component
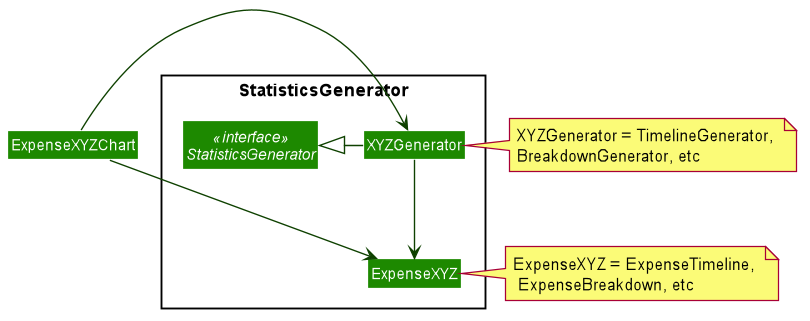
The concrete ExpenseChart obtains the data to be displayed from the StatisticsGenerator component. A number of classes,
such as BreakdownGenerator and TimelineGenerator extend StatisticsGenerator, and each is in charge of creating a specific
statistic type, ie. ExpenseBreakdown and ExpenseTimeline. These concrete statistic types encapsulate all the information relevant
to the statistic, which the concrete ExpenseChart then uses to render the statistic display.
3.6.3. Proposed Implementation
The chart feature can be roughly split two separate parts:
-
The dynamic rendering of the chart whenever the displayed expenses are updated
-
The functionality to switch between different statistic types and configure customization options
| The Observer pattern plays an integral role in the implementation of major part of the system. To summarize, it is a design pattern that achieves decoupling by having observers "subscribe" to changes in an observed object, and being notified upon any changes through callbacks. This is opposed to the observed class directly updating its observers. In the following, the term "notify observers" will be used to denote the act of an observed class being updated and updating all its observers, and the term "on update" will be used to denote the act of an observer receiving updates from its observed class. |
Below is a high level overview of the behaviour of the system when any command is called.
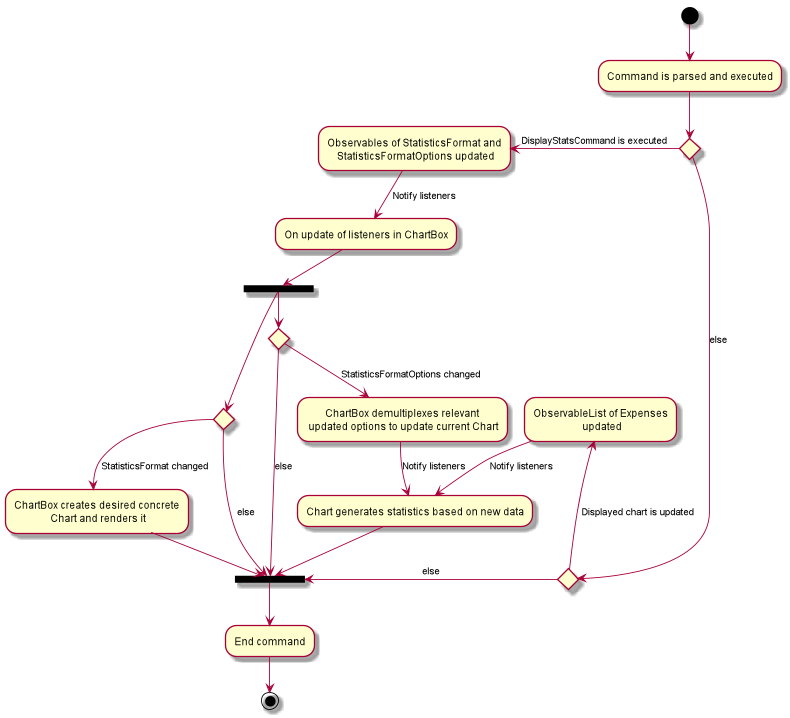
As you can see the logic follows the two paths outlined above. One path where the displayed expenses are updated, and one path where DisplayStatsCommand is executed, updating the chart.
Both paths can lead to the chart updating, followed by the end of the command. Each path will be explored in slightly further detail below.
Update to displayed expenses
-
The current
ExpenseChartobserves the list of expenses that are contained in theMainWindow. -
When a command which updates the expenses is executed, that command updates the list of expenses in the model.
-
That update propagates to the list of expenses in
MainWindow, which notifies the current chart of its changes. -
Using a
StatisticsGenerator, theExpenseChartthen generates the statistics to be displayed from the new expenses. -
In this manner, changes to the list of expenses are propagated to the display.
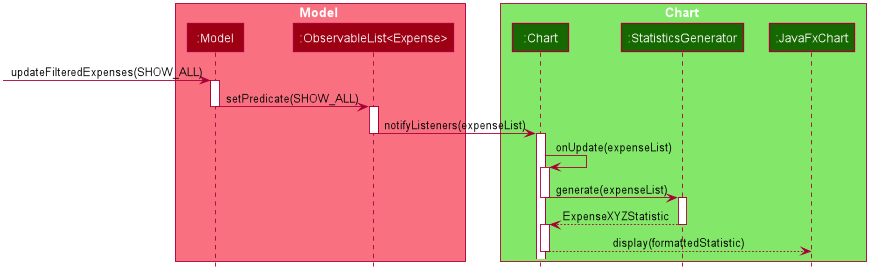
An example of how this works can be seen in the sequence diagram below, in the example where the user changes the displayed expenses by using the ListCommand.
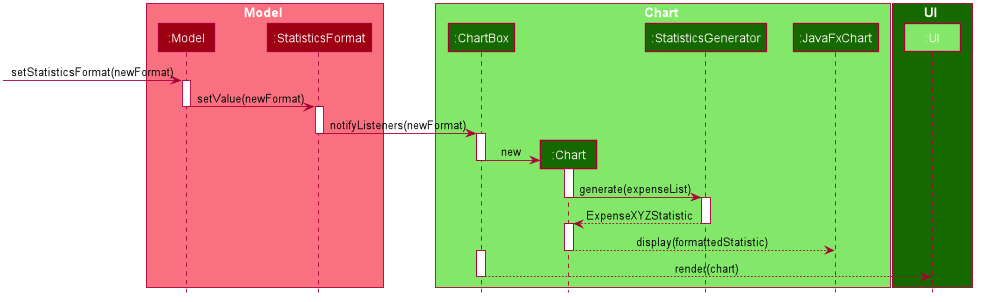
DisplayStatsCommand is called
-
The orchestrating
ChartBoxobservesStatisticsFormatandStatisticsFormatOptionsin the model. -
When
DisplayStatsCommandis called, it updates those two objects in the model sequentially. -
First,
ChartBoxis notified aboutStatisticsFormat, and if there is a new one, it creates the appropriate chart and renders it. -
Next, if there are changes to
StatisticsFormatOptions, theChartBoxpropagates the relevant changes to the current displayed chart, to update its display. -
In this manner, the current chart can be updated with the new
StatisticsFormatandStatisticsFormatOptions.
An example of how this works can be seen in the sequence diagram below, where DisplayStatsCommand is called with a new StatisticsFormat.
StatisticsFormatOptions is omitted for simplicity.
3.6.4. Design Considerations
Aspect: Approach to generating of statistics
-
Alternative one (current choice): Each time there is a change in the backing list of expenses, the statistics are re-generated by the specific
StatisticsGeneratorfor the appropriate statistics format.-
Pros:
-
Simplest implementation, each statistic generator can simply provide a pure function with no side effects that maps from a list of expenses to the desired format of statistics.
-
Runtime is acceptable as most operations can run in O(n) time at worst, with a reasonable input size of expenses.
-
Statelessness means it is thread safe.
-
-
Cons:
-
Even in cases where the backing list of expenses only change by one element (eg. when a single expense is deleted), the entire set of statistics will still be re-generated from the list, thus potentially incurring an expensive operation each time the list is changed.
-
-
-
Alternative two: Each
StatisticsGeneratorcan be structured as a data structure that keeps track of the current statistics data. Upon a change in the backing list, only the specific change will be propagated, ie. addition of one new expense will internally callStatisticsGenerator#AddExpensewhich modifies the statistics data appropriately.-
Pros:
-
For simple list changes like adding/removing a single expense, this approach is much faster as it does not have to regenerate the statistics from the entire list, the statistics only needs to be updated with the specific change.
-
-
Cons:
-
Complicated, need to include methods to handle cases where expenses are added, removed and updated, for every statistic type. If the entire list is changed frequently, there is no performance benefit.
-
Worse in terms of testability. The
StatisticsGeneratorwill depend on an internal state which can be complicated for certain statistics. -
Not thread safe, in the case of future upgrades to a multi-threaded application, will require adjustments.
-
-
-
Alternative three: The data for certain aggregate statistics formats can be serialized. These formats include things like lifetime average spending per day/week/month, total number of expenses etc. Upon addition/removal/update of expenses, an in-mem copy of the serialized data can be updated and saved.
-
Pros:
-
The data for certain statistics formats will always be quickly available by simply querying the storage.
-
The data can be stored in a human readable format, so users can view those statistics without opening the application.
-
-
Cons:
-
Requires extra complexity to serialize the data upon each change to the overall list of expenses.
-
-
#end::statistics[]
3.7. History feature
3.7.1. Implementation
You can use the history command to view previous actions.
Billboard will store all the command entered even the command fails to execute or in wrong format.
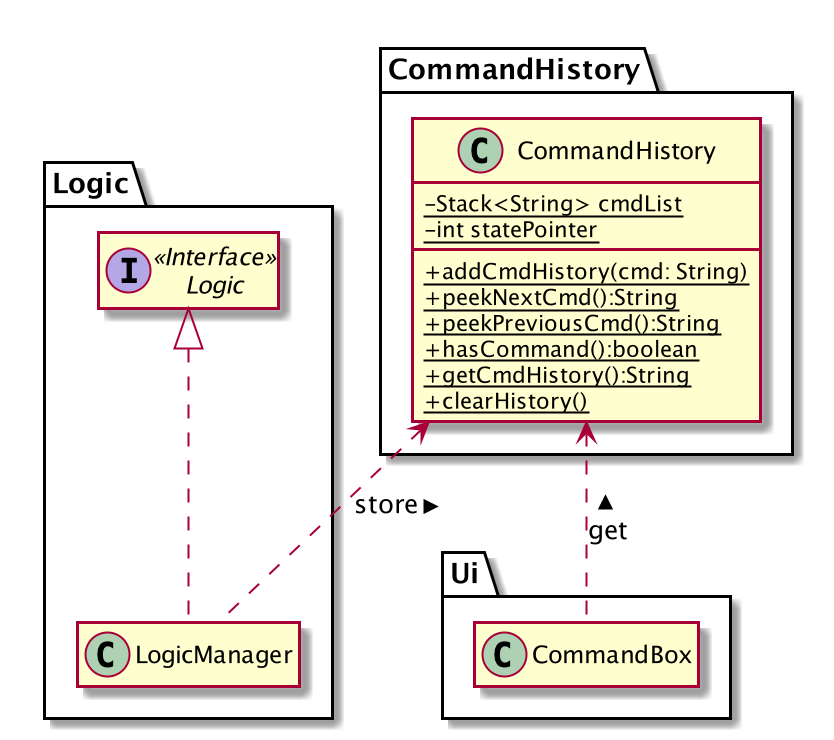
This function is facilitated by the CommandHistory class.
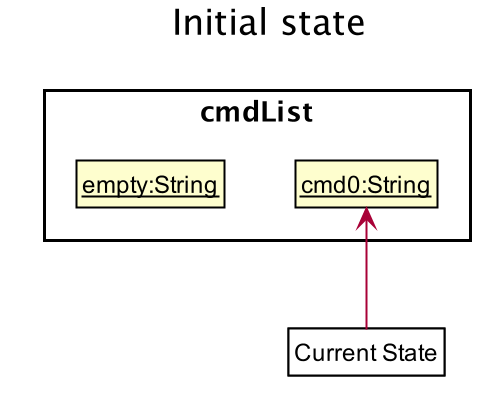
All the histories will be store in a static list cmdList in CommandHistory.
Also, a state pointer that initially point to the start of cmdList will be maintain
for Up(↑)/Down(↓) key feature(See Section 3.8, “Up/Down key feature”)
Additionally, it implements the following operations:
-
CommandHistory#addCmdHistory(String)— Store the command into cmdList. -
CommandHistory#peekNextCmd()— Get the next command in command history. -
CommandHistory#peekPreviousCmd()— Get the previous command in command history. -
CommandHistory#hasCommand()— Check whether any command is executed.
The following sequence diagram shows how the storing operation works:
delete CommandThe LogicManager will store the command to CommandHistory before parsing it to ensure all commands are saved.
3.7.2. Design Considerations
Aspect: How command histories are stored
-
Alternative 1 (current choice): Store all commands including commands that fail to execute.
-
Pros: User can see what goes wrong in the previous command. This is the standard way to implement the history function.
-
Cons: Cost more memory to store all commands.
-
-
Alternative 2: Store commands that is successfully executed and can be undone/redone.
-
Pros: User will not need to view the command that is not useful.
-
Cons: User cannot view the invalid command.
-
3.8. Up/Down key feature
3.8.1. Implementation
You can navigate through the command history by pressing Up(↑)/Down(↓) key in TextFiled.
This feature makes use of the command history and state pointer stored while executing the previous command.
When initializing the fxml object TextFiled in CommandBox class,
an action listener will be set to monitor the keyboard activity.
Whenever a Up(↑)/Down(↓) key is pressed, it will retrieve the previous/next command from the CommandHistory.
Given below is an example usage scenario and how the Up(↑)/Down(↓) mechanism behaves at each step.
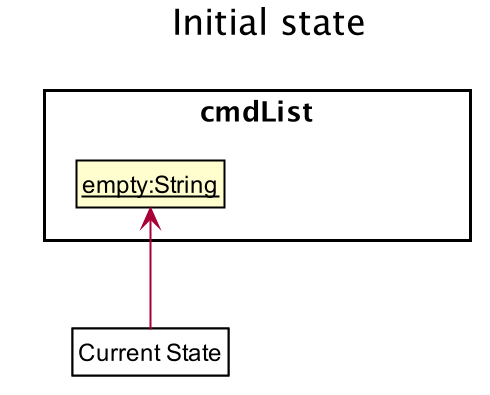
Step 1. The user launches the application for the first time. The CommandHistory will be initialized with no command state, and the statePointer is not pointing to any command state.
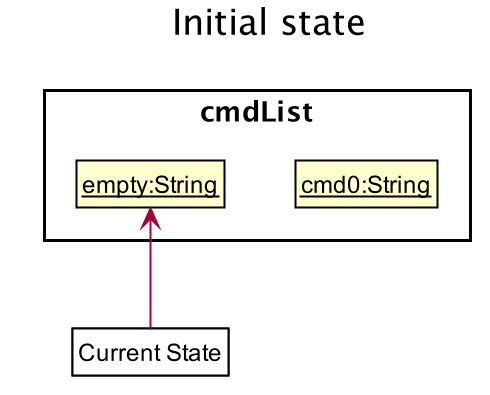
Step 2. The user then execute the delete 5 command to delete the 5th expense in the billboard. The LogicManager calls CommandHistory#addCmdHistory() and a new command is append to the end of cmdList.
Step 3. The user now decides to execute the next command in the command history and press the Up(↑)key.
The actionListener of the TextField will call CommandHistory#peekNextCmd(),
which will shift the statePointer once to the right,
pointing it to the next command, and return it.
↑)key
If the statePointer is at the end of cmdList, pointing to the final command state,
then there are no next command states to get,
it will return the last command to the user rather than attempting to get the next command.
|
The following sequence diagram shows how the Up(↑)key works:
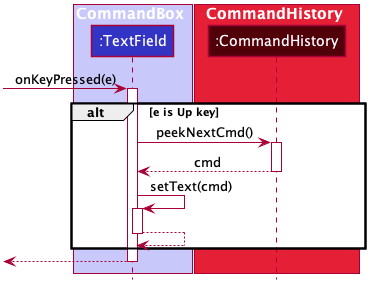
↑)keyThe Down(↓) key does the opposite — it calls CommandHistory#peekPreviousCmd(),
which shifts the statePointer once to the left,
pointing to the previous command state, and return the command.
3.8.2. Design Considerations
Aspect: How command histories are stored
-
Alternative 1 (current choice): Navigate through all commands including invalid commands.
-
Pros: User can edit the invalid command easily, without typing the whole command again.
-
Cons: The static object will need to stay in the memory.
-
-
Alternative 2: Only navigate through commands that can be undone/redone.
-
Pros: User require less time to navigate through the history to find the command(commands that can be undone/redone are usually long)
-
Cons: User will not be able to edited the previous invalid command, cost more time to type the whole command again.
-
3.9. Logging
We are using java.util.logging package for logging. The LogsCenter class is used to manage the logging levels and logging destinations.
-
The logging level can be controlled using the
logLevelsetting in the configuration file (See Section 3.10, “Configuration”) -
The
Loggerfor a class can be obtained usingLogsCenter.getLogger(Class)which will log messages according to the specified logging level -
Currently log messages are output through:
Consoleand to a.logfile.
Logging Levels
-
SEVERE: Critical problem detected which may possibly cause the termination of the application -
WARNING: Can continue, but with caution -
INFO: Information showing the noteworthy actions by the App -
FINE: Details that is not usually noteworthy but may be useful in debugging e.g. print the actual list instead of just its size
3.10. Configuration
Certain properties of the application can be controlled (e.g user prefs file location, logging level) through the configuration file (default: config.json).
4. Documentation
Refer to the guide here.
5. Testing
Refer to the guide here.
6. Dev Ops
Refer to the guide here.
Appendix A: Product Scope
Target user profile:
-
has a need to manage a significant number of expenses
-
prefer desktop apps over other types
-
can type fast
-
prefers typing over mouse input
-
is reasonably comfortable using CLI apps
Value proposition: manage expenses faster than a typical mouse/GUI driven app
Appendix B: User Stories
Priorities: High (must have) - * * *, Medium (nice to have) - * *, Low (unlikely to have) - *
| Priority | As a … | I want to … | So that I can… |
|---|---|---|---|
|
new user |
See command instruction and usage |
Refer to instructions when I forget how to use the App |
|
user |
add a new record |
Track my spending/income |
|
Forgetful user |
Add additional details through a description for each record |
Better keep track of the details of an expense/income |
|
user |
Delete a record |
Remove expenses/income that I no longer need |
|
Careless user |
Edit an existing record |
Make changes to any mistakes made |
|
user |
View a record |
View additional information of an expense/income |
|
user |
Tag a record |
Categorize and better manage my records |
|
user |
Specify a time stamp on expenses |
Know when I spend my money |
|
user |
Sort and filter records by category or tag |
Know how my spending/income is distributed |
|
user |
Archive past records |
Better manage current expenses |
|
user |
Unarchive records |
|
|
user |
View the list of records in an archive |
Keep track of what records I have in a particular archive |
|
user |
View the list of all archives |
Keep track of how many archives I have and what their names are |
|
user |
Delete an archived record |
Delete archive entries that are no longer needed |
|
user |
Deleted an entire archive |
Delete any unneeded archive |
|
Visually inclined user |
Attach an image to each record |
Conveniently record additional details of the expense instead of typing it all out |
|
user |
Create custom tags |
To better categorise my expenses |
|
user |
Hide records |
Maintain privacy on certain sensitive expenses/income |
|
Student who tends to overspend |
Set a time-based budget |
Regulate my spending for the day/week/month with a set limit |
|
Busy student |
Automate archiving of outdated records |
Not need to manually archive them constantly |
|
Frequent traveller |
Add records in foreign currency |
Track my expenses when overseas conveniently without having to manually convert currencies |
|
Data oriented user |
Have monthly statistics on my expenses |
Better track and manage my expenses |
|
User who manages my finance daily |
Use one-shot/shortcut commands |
Use the program more efficiently |
|
User |
Set a password for this application |
Hide my data |
{More to be added}
Appendix C: Use Cases
(For all use cases below, the System is the Billboard and the Actor is the user, unless specified otherwise)
UC01: Adding a tag to an expense
MSS
-
User requests to list expenses
-
Billboard shows a list of recent expenses
-
User requests to tag a specific expense in the list
-
Billboard tags the specific expense with the input tag name
Use case ends.
Extensions
-
2a. There are no recent expenses.
-
2a1. Billboard displays an empty list
Use case ends.
-
-
3a. The given index or tag name is invalid
-
3a1. Billboard shows an error message.
Use case resumes at step 2.
-
UC02: Filter expenses by tag
MSS
-
User requests to list all tags
-
Billboard shows a list of tags
-
User requests to filter expenses by specific tag
-
Billboard shows a list of recent expenses under the specific tag.
Use case ends.
Extensions
-
2a. There are no existing tags
-
2a1. Billboard displays an empty list
Use case ends.
-
-
3a. The given tag name is invalid
-
3a1. Billboard shows an error message.
Use case resumes at step 2.
-
UC03: Add an expense to an archive
MSS
-
User requests to list recent expenses
-
Billboard shows a list of recent expenses
-
User requests to list all archives
-
Billboard shows a list of archives
-
User requests to add a specific expense into a specific archive
-
Billboard removes the specific expense from list of current records and adds it to the specific archive
Use case ends.
Extensions
-
2a. There is no current records
-
2a1. Billboard displays an empty list
Use case ends.
-
-
4a. There are no existing archives
-
4a1. Billboard shows an empty list.
Use case ends.
-
-
5a. The given record index or archive name is invalid
-
5a1. Billboard shows an error message.
Use case resumes at step 4.
-
UC04: Deleting an archived expense
MSS
-
User requests to list all expenses under a specific archive
-
Billboard shows a list of expenses under the specific archive
-
User requests to delete a specific expense from the archive
-
Billboard deletes the specific expense from the specific archive.
Use case ends.
Extensions
-
2a. The archive has no expenses in it
-
2a1. Billboard displays an empty list
Use case ends.
-
-
2b. The archive name is invalid
-
2b1. Billboard shows an error.
Use case ends.
-
-
3a. The given record index or archive name is invalid
-
3a1. Billboard shows an error message.
Use case resumes at step 2.
-
UC05: Deleting an entire archive
MSS
-
User requests to list all existing archives
-
Billboard shows a list of all existing archives
-
User requests to delete a specific archive from the list
-
Billboard deletes the specific archive
Use case ends.
Extensions
-
2a. There are no existing archives
-
2a1. Billboard displays an empty list
Use case ends.
-
-
3a. The given archive name is invalid
-
3a1. Billboard shows an error.
Use case resumes at step 2.
-
UC06: Finding a expense record by keywords, date created and amount spent
MSS
-
User enters parameters that is used to filter expenses.
-
Billboard displays a list of expenses that satisfies all the parameters.
Use case ends.
Extensions
-
2a. There are no expenses that satisfies all the parameters in user input.
-
2a1. Billboard displays an empty list
Use case ends.
-
-
2a. Parameters are not in the correct format.
-
2a1. Billboard displays an error message and informs user of correct usage.
Use case ends.
-
{More to be added}
Appendix D: Non Functional Requirements
-
Should work on any mainstream OS as long as it has Java
11or above installed. -
Should be able to hold up to 1000 expenses/income records without a noticeable sluggishness in performance for typical usage.
-
A user with above average typing speed for regular English text (i.e. not code, not system admin commands) should be able to accomplish most of the tasks faster using commands than using the mouse.
-
Commands are easy to remember and intuitive.
-
The software should work without requiring an installer./portable.
-
The data should be stored locally and should be in a human editable text file.
-
Software is for single users only.
-
The software should not depend on a remote server.
{More to be added}
Appendix F: Product Survey
Product Name
Author: …
Pros:
-
…
-
…
Cons:
-
…
-
…
Appendix G: Instructions for Manual Testing
Given below are instructions to test the app manually.
| These instructions only provide a starting point for testers to work on; testers are expected to do more exploratory testing. |
G.1. Launch and Shutdown
-
Initial launch
-
Download the jar file and copy into an empty folder
-
Double-click the jar file
Expected: Shows the GUI with a set of sample contacts. The window size may not be optimum.
-
-
Saving window preferences
-
Resize the window to an optimum size. Move the window to a different location. Close the window.
-
Re-launch the app by double-clicking the jar file.
Expected: The most recent window size and location is retained.
-
{ more test cases … }
G.2. Deleting an expense
-
Deleting an expense while all expenses are listed
-
Prerequisites: List all expenses using the
listcommand. Multiple expenses in the list. -
Test case:
delete 1
Expected: First expense is deleted from the list. Details of the deleted expense shown in the status message. Timestamp in the status bar is updated. -
Test case:
delete 0
Expected: No expense is deleted. Error details shown in the status message. Status bar remains the same. -
Other incorrect delete commands to try:
delete,delete x(where x is larger than the list size) {give more}
Expected: Similar to previous.
-
{ more test cases … }
G.3. Adding tags to an expense
-
Adding tags to an expense in a list with multiple expenses.
-
Prerequisites: Multiple expenses in the list. First expense does not have the tag "holiday" but have the tag "tech".
-
Test case:
tag add 1 t/holiday
Expected: Tag "holiday" is added to the first expense. Details of first expense shown in the status message. -
Test case:
tag add 1 t/tech
Expected: No tags added to any expense. Error details shown in the status message. -
Test case:
tag add 1 t/holiday t/tech
Expected: Tag "holiday" is added to the first expense. Details of first expense shown in the status message. -
Test case:
tag add 0 t/holiday
Expected: No tags added to any expense. Error details shown in the status message. -
Test case:
tag add 1 holiday
Expected: No tags added to any expense. Error details shown in the status message. -
Test case:
tag add 1 t/holiday time
Expected: No tags added to any expense. Error details shown in the status message. -
Test case:
tag add 1 t/holiday__
Expected: No tags added to any expense. Error details shown in the status message.
-
-
Adding tags to an expense in an empty list
-
Test case:
tag add 1 t/holiday
Expected: No tags added to any expense. Error details shown in the status message.
-
G.4. Removing tags from an expense
-
Removing tags from an expense in a list with multiple expenses.
-
Prerequisites: Multiple expenses in the list. First expense has the tag "holiday" but does not contain the tag "tech".
-
Test case:
tag rm 1 t/holiday
Expected: Tag "holiday" is removed from the first expense. Details of first expense shown in the status message. -
Test case:
tag rm 1 t/tech
Expected: No tag removed from any expense. Error details shown in the status message. -
Test case:
tag rm 1 t/tech t/holiday
Expected: Tag "holiday" is removed from the first expense. Details of first expense shown in the status message. -
Test case:
tag rm 0 t/holiday
Expected: No tag removed from any expense. Error details shown in the status message. -
Test case:
tag rm 1 holiday
Expected: No tag removed from any expense. Error details shown in the status message. -
Test case:
tag rm 1 t/holiday time
Expected: No tag removed from any expense. Error details shown in the status message. -
Test case:
tag rm 1 t/holiday__
Expected: No tag removed from any expense. Error details shown in the status message.
-
-
Removing tags from an expense in an empty list
-
Test case:
tag rm 1 t/holiday
Expected: No tag removed from any expense. Error details shown in the status message.
-
G.5. Filtering expenses by tag
-
Filtering expenses by tag while all expenses are listed
-
Prerequisites: List all expenses using the
listcommand. Multiple expenses in the list. One or more expenses contain the tag "holiday". All expenses do not contain the tag "tech" -
Test case:
tag filter t/holiday
Expected: Expenses that contain the tag "holiday" are listed out. Number of expenses shown in status message. -
Test case:
tag filter t/tech
Expected: No expense listed out.
-
G.6. Listing out all existing tags
-
Listing out all existing tags while all expenses are listed
-
Prerequisites: List all expenses using the
listcommand. -
Test case:
tag list
Expected: All existing tags are listed out in the status message.
-
G.7. Adding an expense to an archive
-
Adding an expense to an archive when current expenses list.
-
Prerequisites: List all expenses using the
listcommand. At least 3 expenses in the list. Test cases should be completed in chronological order. -
Test case:
archive add 1 arc/test
Expected: First expense is removed from the list. Message in result box indicates that atestarchive is created, since it was not an existing archive prior, and the first expense was added to it.
Use thearchive list testcommand to display the archive list to check if the expense was correctly archived.
After verifying, use thelistcommand to go back to the default list of expenses. -
Test case:
archive add 2 arc/test
Expected: Second expense is removed from the list. However, since thetestarchive was already created in the first test case, the message in the result box would only indicate that the second expense was added to thetestarchive.
Use thearchive list testcommand to display the archive list check if the expense was correctly archived.
After verifying, use thelistcommand to go back to the default list of expenses. -
Test case:
archive add 0 arc/test
Expected: No expenses removed from the list and no creation of archives. An invalid archive command message should appear in the result box. -
Test case:
archive add X arc/test(where X is larger than the list size)
Expected: No expenses removed from the list and no creation of archives. An error message indicating an invalid expense index will be shown in the result box. -
Test case:
archive addorarchive add X(where X is any invalid argument string not in the form of[INDEX] arc/[ARCHIVE NAME])
Expected: No expenses removed from the list and no creation of archives. The invalid archive command format message and thearchive addusage message should appear in the result box.
-
G.8. Displaying the expenses in an archive
-
Displaying the expenses in a particular archive when any list of expenses are listed.
-
Prerequisites: Test cases in this section should be done after carrying out the test cases in the Adding an expense to an archive section.
-
Test case:
archive list test
Expected: The list of expenses displayed should change to contain the two expenses archived in the prior Adding an expense to an archive section. -
Test case:
archive listorarchive list X(where X is any amount of whitespace)
Expected: An error message indicating that the archive name cannot be empty and thearchive listusage message will be displayed in the result box. -
Test case:
archive list X(where X is any non-existent archive name)
Expected: An error message indicating that there is no existing archive name and thearchive listusage message will be displayed in the result box.
-
G.9. Displaying a list of archive names
-
Displaying the list of archive name when any list of expenses are listed
-
Prerequisites: Test cases in this section should be done after carrying out the test cases in the Adding an expense to an archive section.
-
Test case:
archive listallorarchive listall X(where X is any String)
Expected: The displayed list of expenses should not be changed. The result box should display a list of existing archive names, includingtestarchive which was added in the prior Adding an expense to an archive section.
-
G.10. Deleting an expense from an archive
-
Deleting an expense from an archive. Test cases should be completed in chronological order.
-
Prerequisites: List the expenses in a particular archive using the
archive list [ARCHIVE NAME]command. Have 2 expenses in this archive. All test cases in this section will be done using this same [ARCHIVE NAME] archive. -
Test case:
archive delete 1 arc/[ARCHIVE NAME]
Expected: The expense in the first index should be removed from the list. A message indicating that the expense is deleted from the archive will be displayed in the result box. -
Test case:
archive deleteorarchive delete X(where X is any string not in the form of [INDEX] arc/[ARCHIVE NAME])
Expected: No change in the list of expenses displayed. The invalid command format message andarchive deleteusage message are displayed in the result box. -
Test case:
archive delete 1 arc/[ARCHIVE NAME]
Expected: Since there is only one expense in the [ARCHIVE NAME] archive left, the empty archive will be deleted together with the expense as well.
The displayed list of expenses will switch back to the default non-archive expense list.
A message indicating the deletion of the expense and the archive will be displayed in the result box.
-
G.11. Reverting/unarchiving an expense from an archive
-
Unarchives an expense from an archive. Test cases should be completed in chronological order.
-
Prerequisites: List the expenses in a particular archive using the
archive list [ARCHIVE NAME]command. Have 2 expenses in this archive. All test cases in this section will be done using this same [ARCHIVE NAME] archive. -
Test case:
archive revert 1 arc/[ARCHIVE NAME]
Expected: The expense in the first index should be removed from the list. A message indicating that the expense is removed from the archive and added back to the current expense list will be displayed in the result box. Use thelistcommand to display the current non-archive expense list to check if the expense was correctly reverted back. The reverted expense should be at the last index of the current expense list.
After verifying, use thearchive list [ARCHIVE NAME]command to go back to the archive list of expenses. -
Test case:
archive revertorarchive revert X(where X is any string not in the form of [INDEX] arc/[ARCHIVE NAME])
Expected: No change in the list of expenses displayed. The invalid command format message andarchive revertusage message are displayed in the result box. -
Test case:
archive revert 1 arc/[ARCHIVE NAME]
Expected: Since there is only one expense in the [ARCHIVE NAME] archive left, the empty archive will be deleted after the expense is removed from it.
The displayed list of expenses will switch back to the default non-archive expense list. The reverted expenses should be at the last index of the displayed list of default non-archive expenses.
A message indicating that the expense is removed from the archive and added back to the current expense list, and the deletion of the archive will be displayed in the result box.
-